
In this chapter, we’ll discuss where to find the Supplier App and how you can use it to sync your Shopify store to your Dropshipzone Supplier Account, upload new products from Shopify to Dropshipzone, and manage existing products.
Getting Started
What is Supply for Dropshipzone?
Supply for Dropshipzone is a convenient way for Suppliers to sync their Dropshipzone Supplier accounts to their Shopify store. Using our app, you’ll be able to:
- Keep track of your inventory levels.
- Easily export new product information.
- Manage and update existing product information.
We’ve made the process of uploading products between platforms simple. With just a few clicks, you can export your entire Shopify store into a single CSV file, ready to upload to Dropshipzone.
Where can I find the Supplier App?
You can find our app for free on the Shopify App Store.
- Sign into the Shopify App Store.
- Search for “Supply for Dropshipzone”.
- Select “Supply for Dropshizone” from the dropdown menu.
Setting up the Supplier App
- Log into your account using your Dropshipzone Supplier Details. You’ll only be asked to do this once.
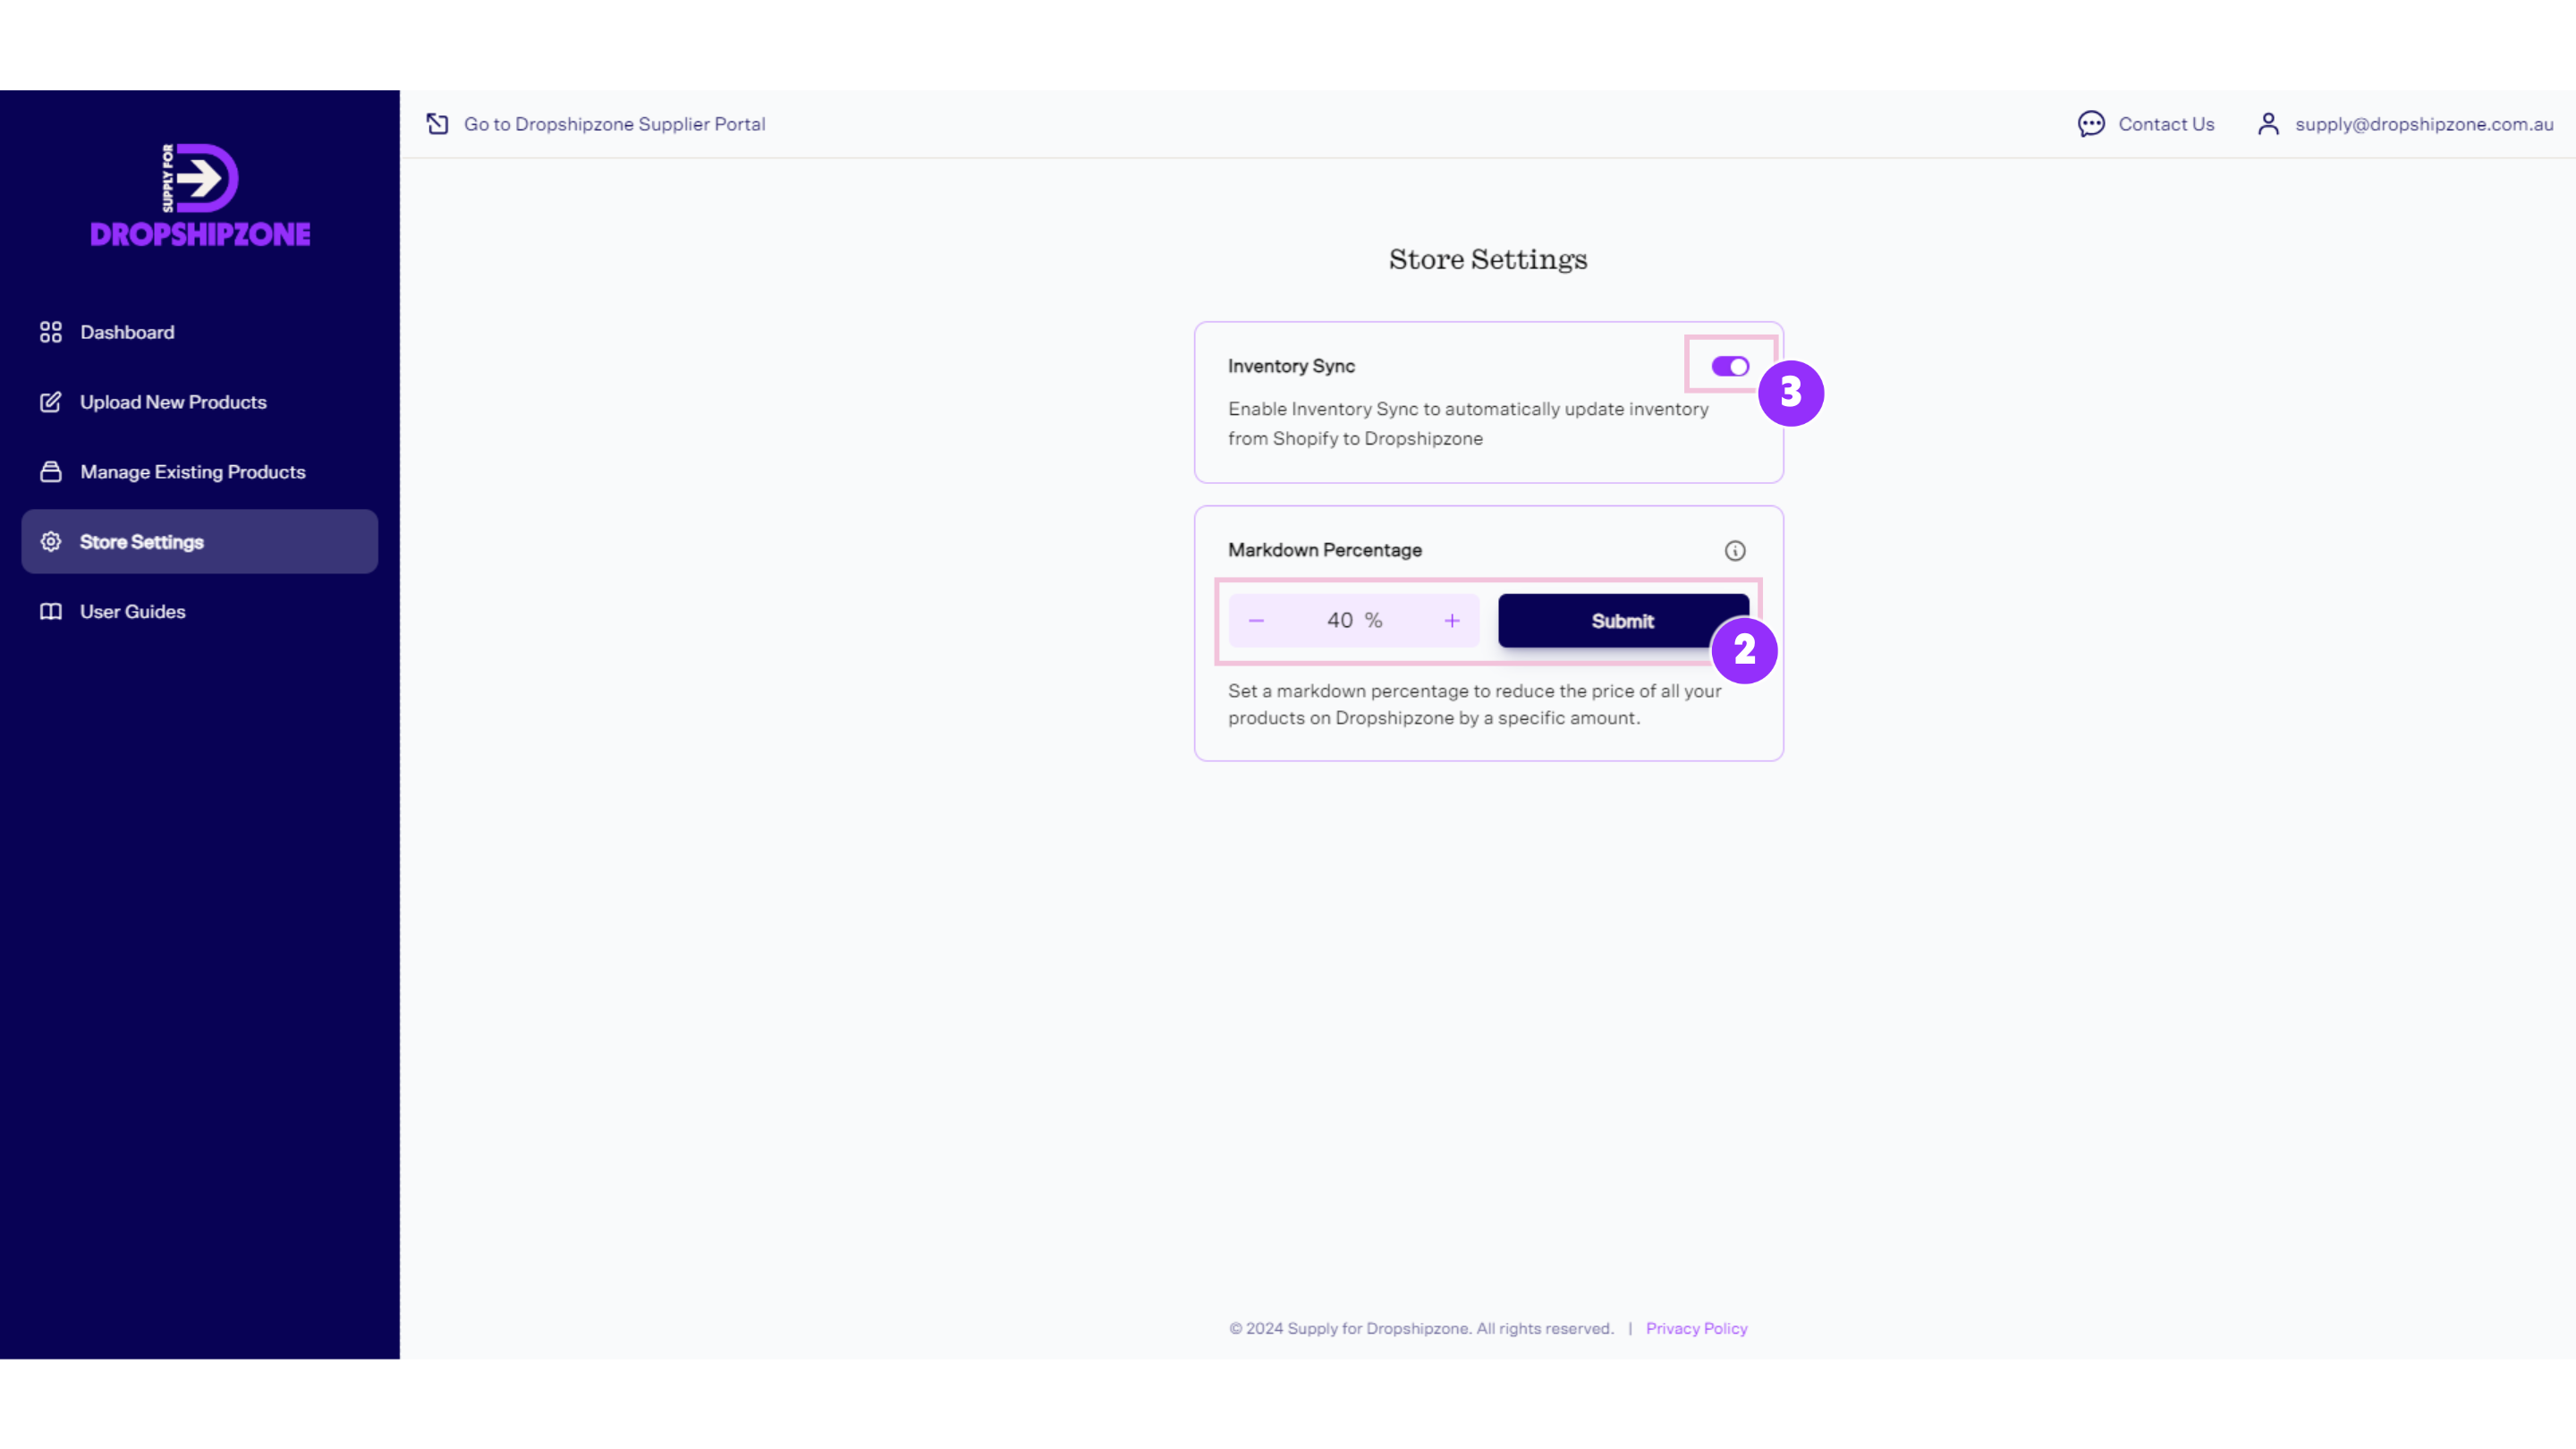
- Set your store Markdown Percentage. This will automatically reduce the price of all your products on Dropshipzone by the specified amount. For example, if you have a product listed on your Shopify website for $100, and you set a Percentage Markdown for 15%, the product will sell on Dropshipzone for $85.some text
- This percentage is set to 10 per cent by default. You cannot set a markdown percentage below 10%. If you would like to set a markdown percentage of less than 10%, you will need to set prices manually through the Supplier Portal.
- Turn on Inventory Sync. This allows you to sync your inventory levels with Dropshipzone. Inventory Sync will automatically run every hour. Please note: If you turn on Inventory Sync, Supply for Dropshipzone will sync all products from your Shopify store.
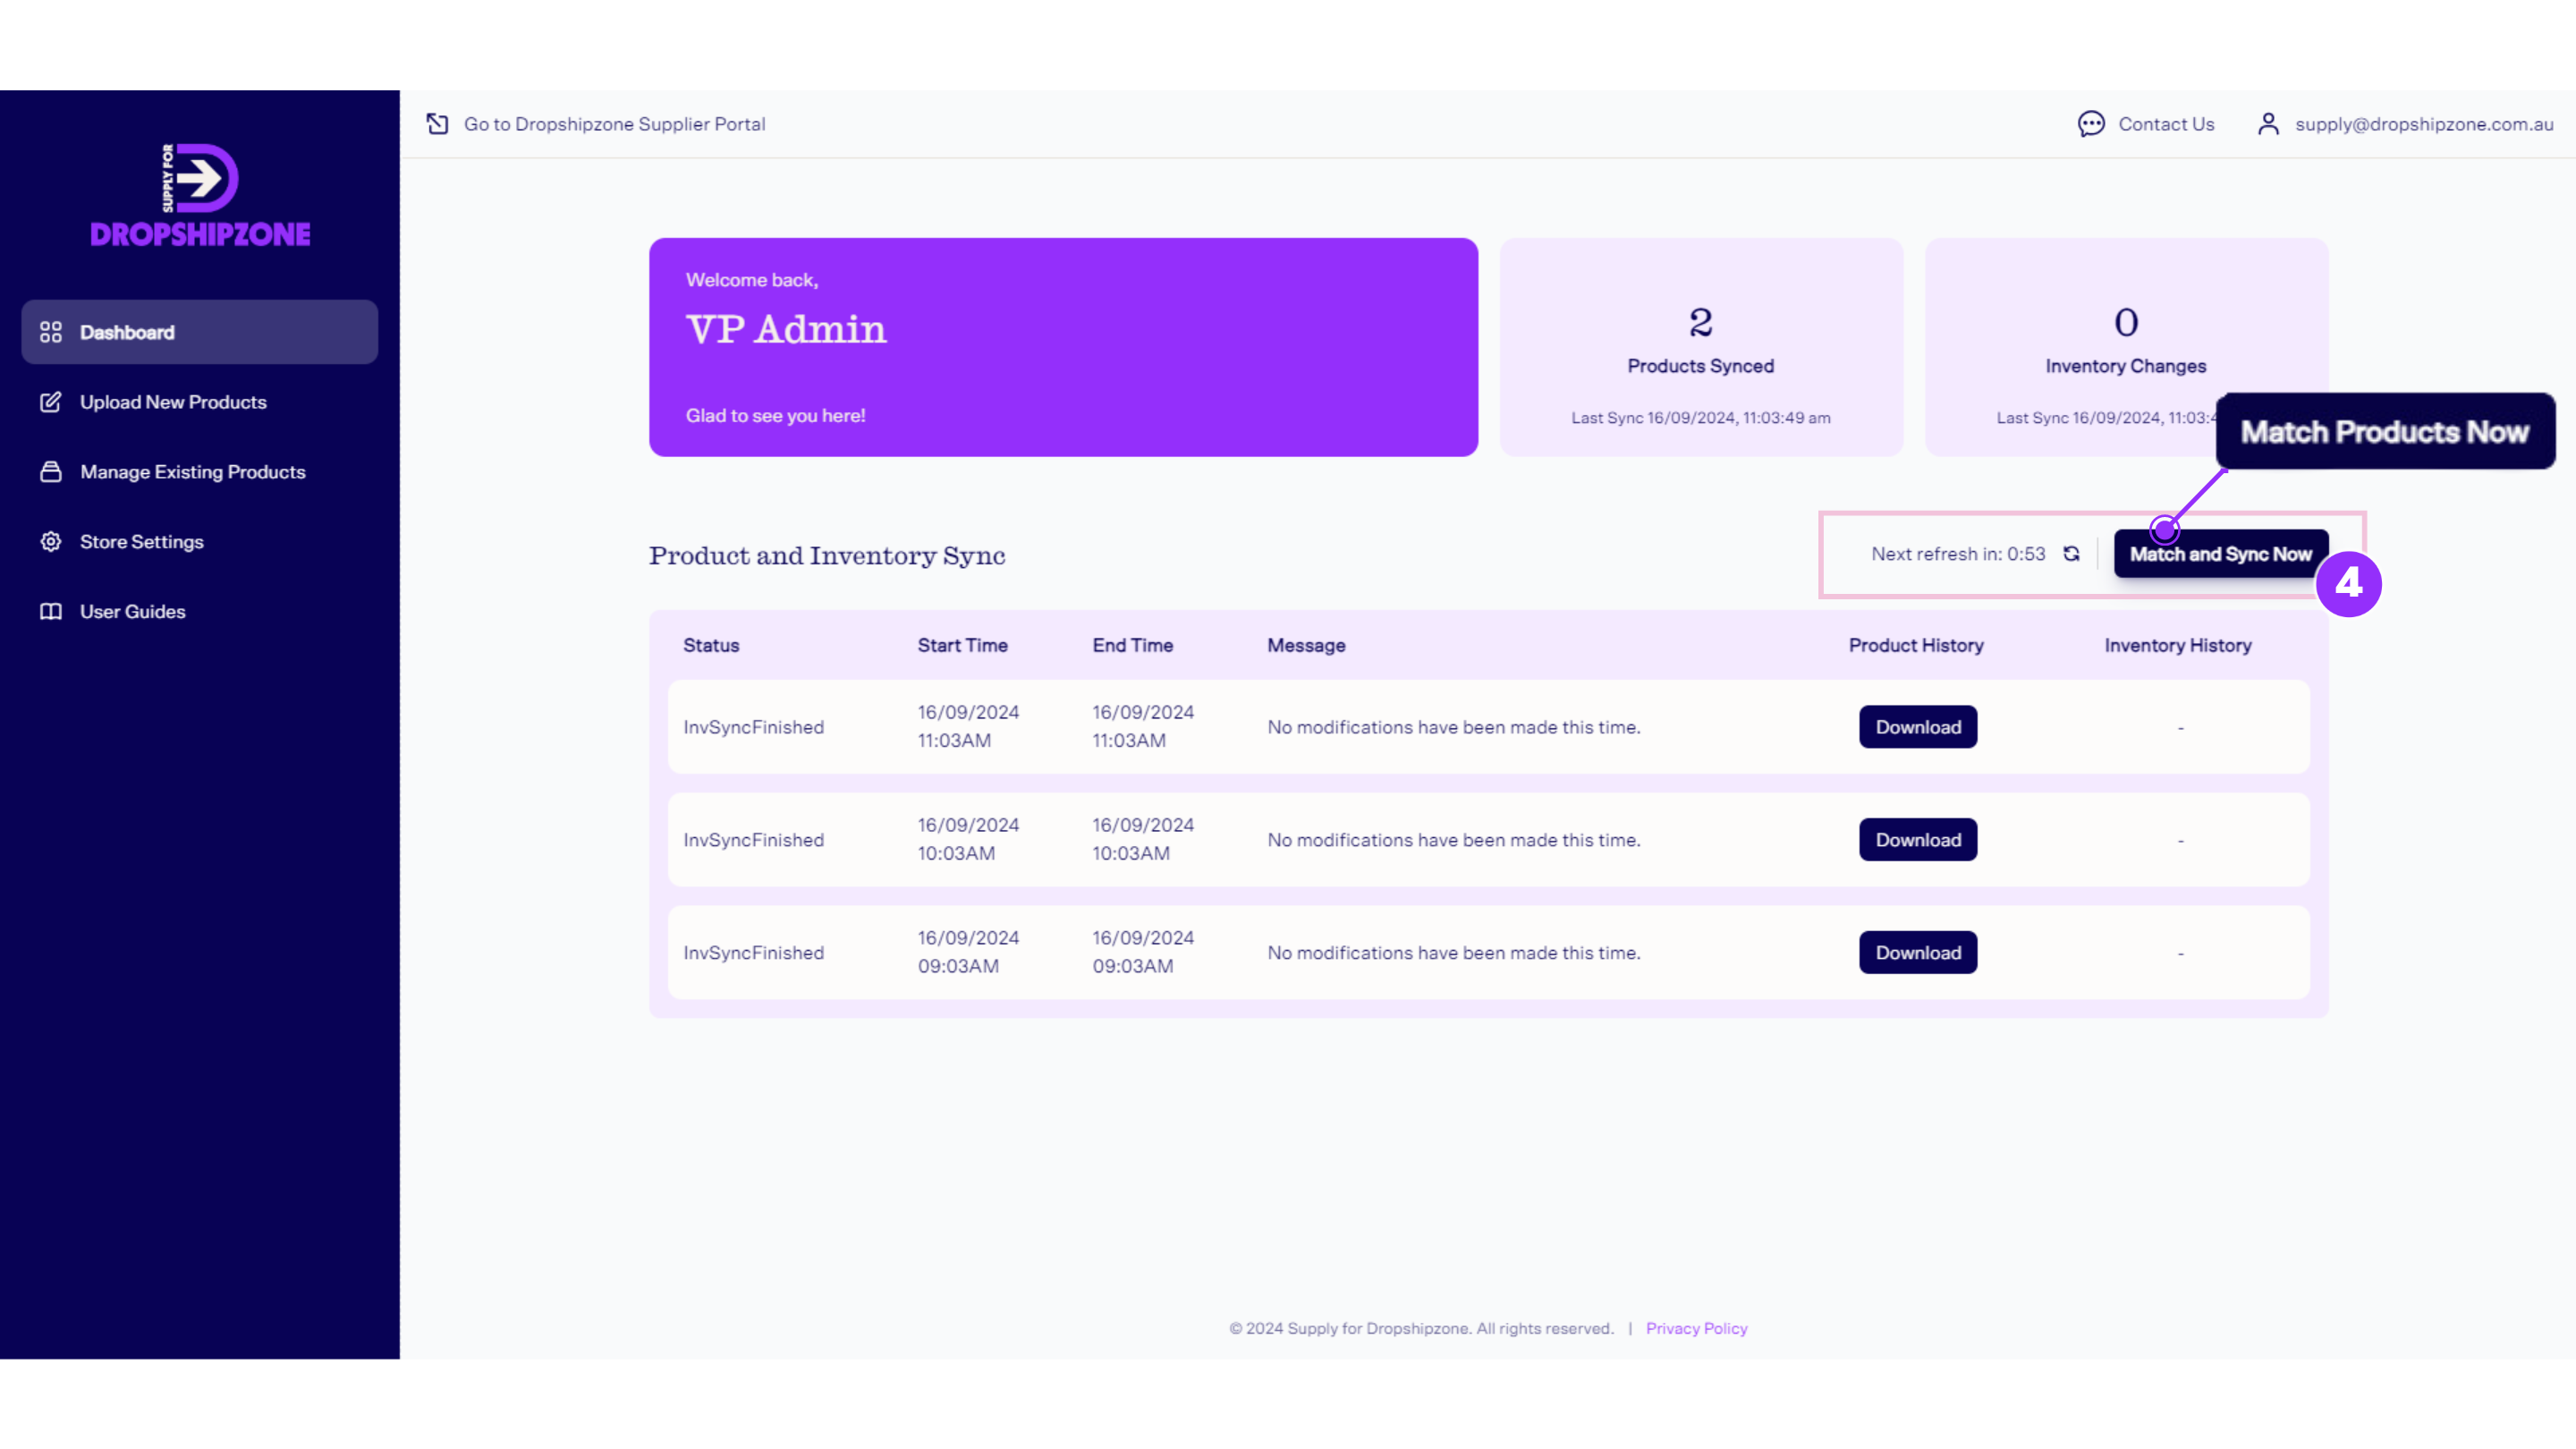
4. Go to your Dashboard. From here, you’ll need to manually match and sync your products. If Inventory Sync is turned on, click on “Match and Sync Now”. If Inventory Sync is turned off, click on “Match Products Now”. This will manually prompt the system to sync your products for the first time. A progress notification will appear that says “Match and Sync in Progress”.
- Wait for the match and sync to complete. Once match and sync is complete, a “MatchingFinished” status will appear in your Dashboard activity summary. Note: This process may take some time depending on the number of SKUs. some text
- If you receive an error message, ensure that you have products available on Shopify and that your products are correctly uploaded to your Shopify store.
- Head to the Upload New Products tab and generate the CSV file containing your Shopify product catalogue.
.gif)
- Copy the product information from the downloaded CSV file into the Excel import template, then upload the Excel file via the Supplier Portal to import the products.
- Check for product and inventory sync activity on your Dashboard.
My Dashboard
What is on my Dashboard?
The Dashboard shows your most recent store activity and the number of products synced between the two sites, as well as your total inventory changes.
Your portal will automatically match and sync every hour.
The Dashboard contains the following:
- Your account name.
- Products synced: How many products total have been synced between your Shopify store and your Dropshipzone Supplier account.
- Inventory changes: Total inventory changes between your Shopify store and your Dropshipzone Supplier account.
- Your three most recent store activities. Some of your updates will include download prompts. These are logs of the changes that you can keep for your records. some text
- Product history: If available, you can download a CSV file containing product information for both Shopify and Dropshipzone listings.
- Inventory history: If available, you can download a CSV file containing inventory changes for both Shopify and Dropshipzone listings.
- Countdown to the next Dashboard refresh. The app will refresh your Dashboard once every minute.
- Instant sync: Supply for Dropshipzone will sync the latest information on your Shopify store every hour. To start the sync process manually, click the Instant Sync button. If Inventory Sync is turned on, the button will read “Match and Sync Now”. If Inventory Sync is turned off, the button will read “Match Products Now”.
Upload New Products
Uploading new products
- Click on the Upload New Products tab.
- Click “Generate Files”. This will generate a new CSV file containing all of your products that have been successfully processed.some text
- Note: The Sub-subcategories and Shipping fields must be filled manually before uploading the file to the Dropshipzone Supplier Portal.
- For Sub-subcategories: If you do not choose a product category, our AI system will automatically assign category codes to your products based on the product titles.
- Copy the product information from the downloaded CSV file into the Excel import template, then upload the Excel file via the Supplier Portal to import the products.
- If any products were unsuccessfully processed, an “Error Products” file will also be created.
- Click on “Go to Dropshipzone Supplier Portal”. You’ll be redirected to the New Products page in the Supplier Portal, where you can immediately upload your Excel file.
Template fields:
✔ SKU: Product SKU code (please only use numbers, uppercase letters and hyphens ‘-’ as spaces. No other special characters or spaces are permitted).
✔ SKU title: Product title.
✔ Parent SKU: Parent SKU code (upper case & use hyphens instead of spaces).
✔ Parent SKU title: Product title within Parent listing.
✔ Option 1 name: Product variation type 1 (e.g. size).
✔ Option 1 value: Variation values (e.g. small, medium, large).
✔ Option 2 name: Product variation type 2 (e.g. colour).
✔ Option 2 value: Variation values (e.g. red, blue, green).
✔ EAN Code: A thirteen-digit barcode number (ISBN, UPC, GTIN, etc. is acceptable).
✔ Set to a text format before submission to ensure it displays properly.
✔ Description: Product description, specifications, features, and package contents. Must be in HTML code format.
✔ Status: Use ‘1’ for enable, ‘0’ for disable.
✔ Brand Name: Product brand name.
✔ Colour: Product colour.
✔ Package Weight: Packaged product weight.
✔ Package Length: Packaged product length.
✔ Package Width: Packaged product width.
✔ Package Height: Packaged product height.
✔ Package CBM(m3): Packaged product dimensions in cubic square metres.
✔ Price (Incl. GST): The product selling price on Dropshipzone.
- Note: Prices shown in the file are based on your Markdown Percentage.
✔ RRP (Incl. GST): The recommended retail price.
- Leave blank where no RRP is provided.
- Use ‘Null’ to remove the RRP for existing SKUs.
✔ Stock: On-hand stock / Inventory.
- Note: This field needs to be filled out manually before submission.
✔ Sub-subcategories: Fill in the relevant sub-subcategory code. Refer to the Categories code file in New Products for sub-subcategory codes.
- Note: This field needs to be filled out manually before submission. If you do not choose a product category, our AI system will automatically assign category codes to your products based on the product titles.
✔ Images: Image URLs. Use images with a white background for the head photo.
- Dropbox links or Google Share Drive links are not acceptable.
- Please separate image URLs with a comma ‘,’ for multiple images.
✔ Zone Rates (Incl. GST): Put ‘0’ for free shipping, ‘9999’ for undeliverable zones.
Manage Existing Products
Updating existing product information
- Click on the Manage Existing Products tab.
- Click “Generate Files”. This will generate two new CSV files.some text
- Info Updates: Contains updated information about your product listings.
- Price and Shipping Updates: Contains updated information about your product prices and shipping information.
- If you need to enable or disable products, you’ll need to manually set the Status value accordingly.
- Click on “Go to Dropshipzone Supplier Portal”. You’ll be redirected to the New Products page in the Supplier Portal, where you can immediately upload your Excel file.
Note: You can only update product information and pricing when the Price Review submission window is open. If the Price Review submission window is closed, you will see a notification at the top of the Manage Existing Products page informing you of the next available window. You will be unable to upload the Excel files on the Dropshipzone Supplier Portal until the next submission window.
Template fields (Info Updates):
✔ SKU: Product SKU code (please only use numbers, uppercase letters and hyphens ‘-’ as spaces. No other special characters or spaces are permitted).
✔ SKU title: Product title.
✔ Parent SKU: Parent SKU code (upper case & use hyphens instead of spaces).
✔ Parent SKU title: Product title within Parent listing.
✔ Option 1 name: Product variation type 1 (e.g. size).
✔ Option 1 value: Variation values (e.g. small, medium, large).
✔ Option 2 name: Product variation type 2 (e.g. colour).
✔ Option 2 value: Variation values (e.g. red, blue, green).
✔ EAN Code: A thirteen-digit barcode number (ISBN, UPC, GTIN, etc. is acceptable).
✔ Set to a text format before submission to ensure it displays properly.
✔ Description: Product description, specifications, features, and package contents. Must be in HTML code format.
✔ Status: Use ‘1’ for enable, ‘0’ for disable.
✔ Brand Name: Product brand name.
✔ Colour: Product colour.
✔ Package Weight: Packaged product weight.
✔ Package Length: Packaged product length.
✔ Package Width: Packaged product width.
✔ Package Height: Packaged product height.
✔ Package CBM(m3): Packaged product dimensions in cubic square metres.
✔ Stock: On-hand stock / Inventory.
- Note: This field needs to be filled out manually before submission.
✔ Images: Image URLs. Use images with a white background for the head photo.
- Dropbox links or Google Share Drive links are not acceptable.
- Please separate image URLs with a comma ‘,’ for multiple images.
Template fields (Price and Shipping Updates):
✔ SKU: Product SKU code (please only use numbers, uppercase letters and hyphens ‘-’ as spaces. No other special characters or spaces are permitted).
✔ New Price (Incl. GST): The product selling price on Dropshipzone.
- Note: Prices shown in the file are based on your Markdown Percentage.
✔ New RRP (Incl. GST): The recommended retail price.
- Leave blank where no RRP is provided.
- Use ‘Null’ to remove the RRP for existing SKUs.
✔ Zone Rates (Incl. GST): Put ‘0’ for free shipping, ‘9999’ for undeliverable zones.
Frequently asked questions

Supply for Dropshipzone makes it easy to upload new product information, manage existing products and sync inventory levels between your Shopify store and your Dropshipzone Supplier account. The app will:
- Automatically sync your inventory levels once every hour. This ensures your inventory levels are accurate between platforms.
- Easily create and download CSV files that you can use to import new and existing product information to your Dropshipzone Supplier account.
- Set automatic pricing rules for your Dropshipzone products.
The Supply for Dropshipzone app does not automatically sync products between your Shopify and Dropshipzone accounts. We make it easy to export product information, but products must still be added manually using Excel files.
If you would like to set a percentage markdown lower than 10%, you will need to manually adjust your prices through the Dropshipzone Supplier Portal.
It is not mandatory for Suppliers to use Inventory Sync. If you do not have Inventory Sync turned on, you will need to manually update your inventory levels via the Dropshizone Supplier portal.
What do I do if I receive an error message while matching my products?
When uploading new products: If you receive an Error Products notification, a button will appear to “Download Error Products CSV”. This file will let you know if your products are missing images or other data. This will need to be amended in Shopify. Once you have provided the missing data, visit your dashboard and click “Match and Sync Now”/“Match Products Now”. Once the manual sync is complete, return to the Upload New Products page and click on “Generate Files” to see if the products display correctly.
For first-time users: You must match and sync your products at least once before uploading new products. You will receive an error message if you do not run match and sync first.
If you are still having issues, please contact your account manager for further assistance.


