
Once you’ve imported products to your online store, you’re all set to start selling and handling orders. This chapter covers everything from order management and making payments to cancelling orders, checking order status, and reviewing order history. Let’s dive in!
How do I place orders on Dropshipzone?
Dropshipzone gives you the flexibility to place orders either individually or in batches.
For placing orders individually, follow these steps:
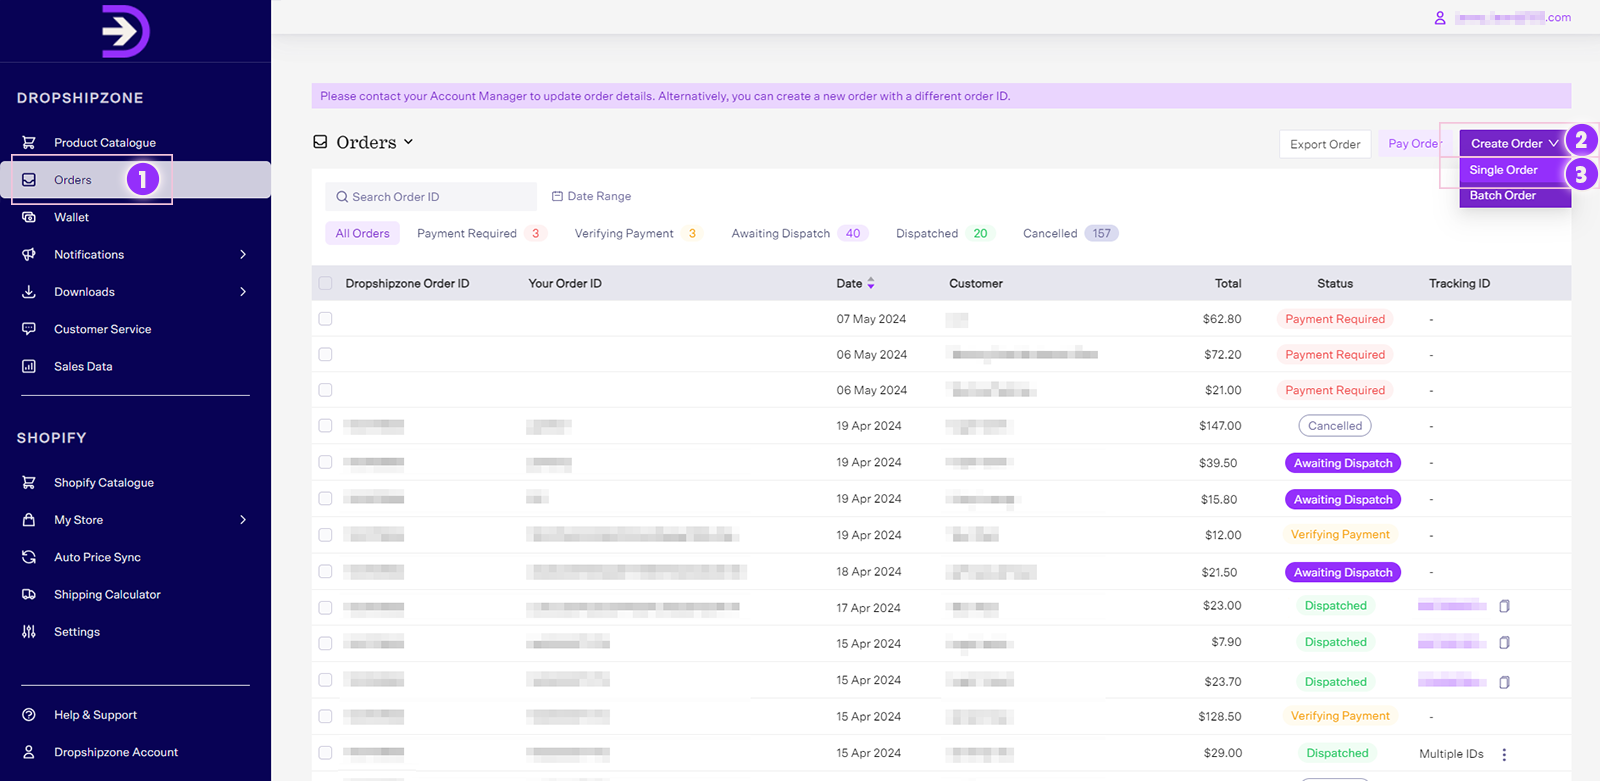
- Navigate to the Orders tab within the Dropshipzone section and click on Create Order and select the Single Order option.
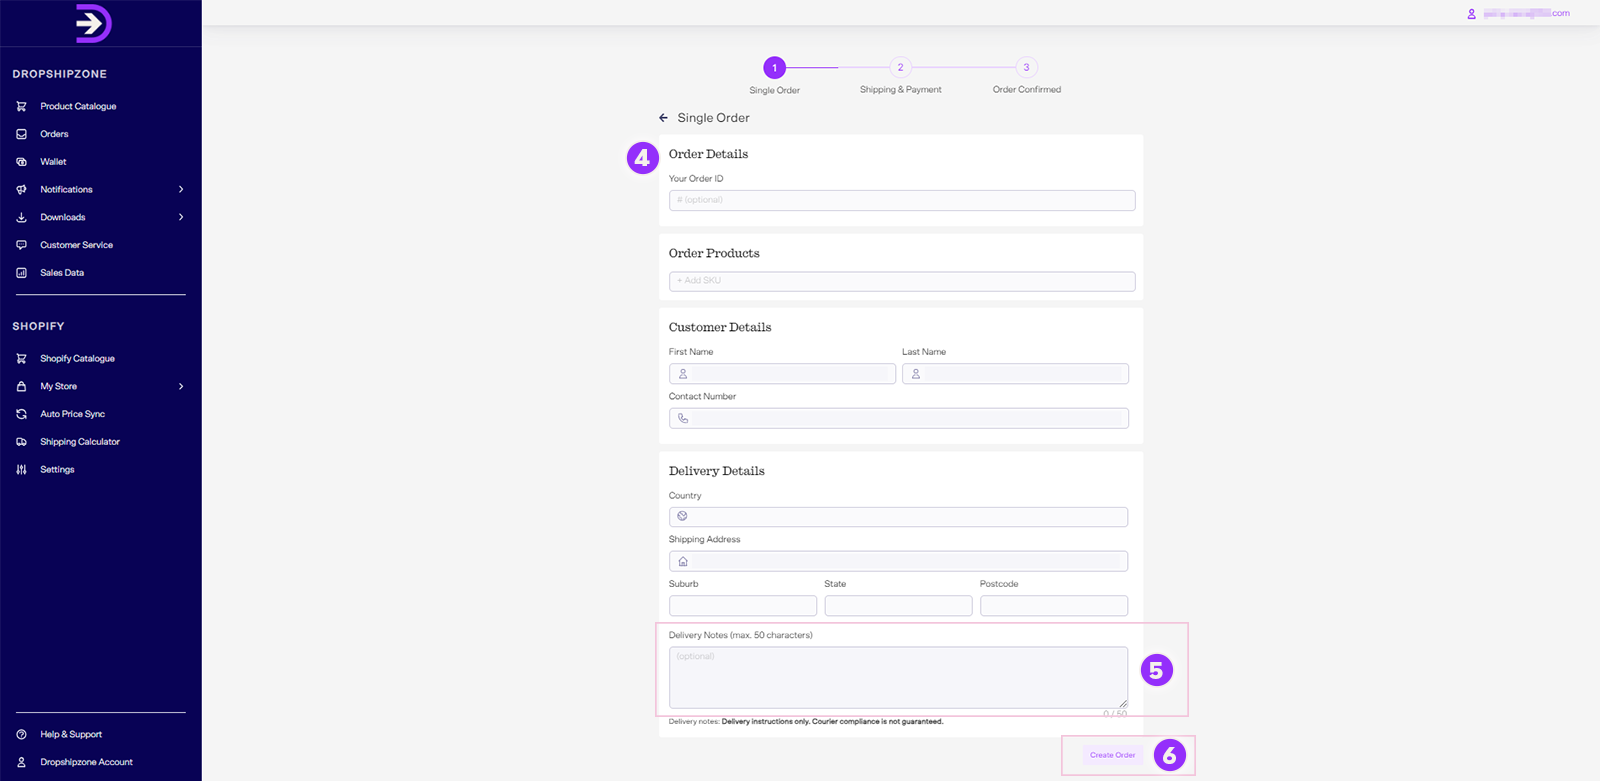
- You have the option to enter your own Order ID for order recognition, and then enter the SKU, customer details, and delivery address. You can even add delivery instructions in the Delivery Notes section, however, courier compliance is not guaranteed. Please note that shipment will go to the address specified during order placement, not the one in your PayPal account.
- Click the Create Order button when you’re ready to place an order.
For placing batch orders, follow these steps:

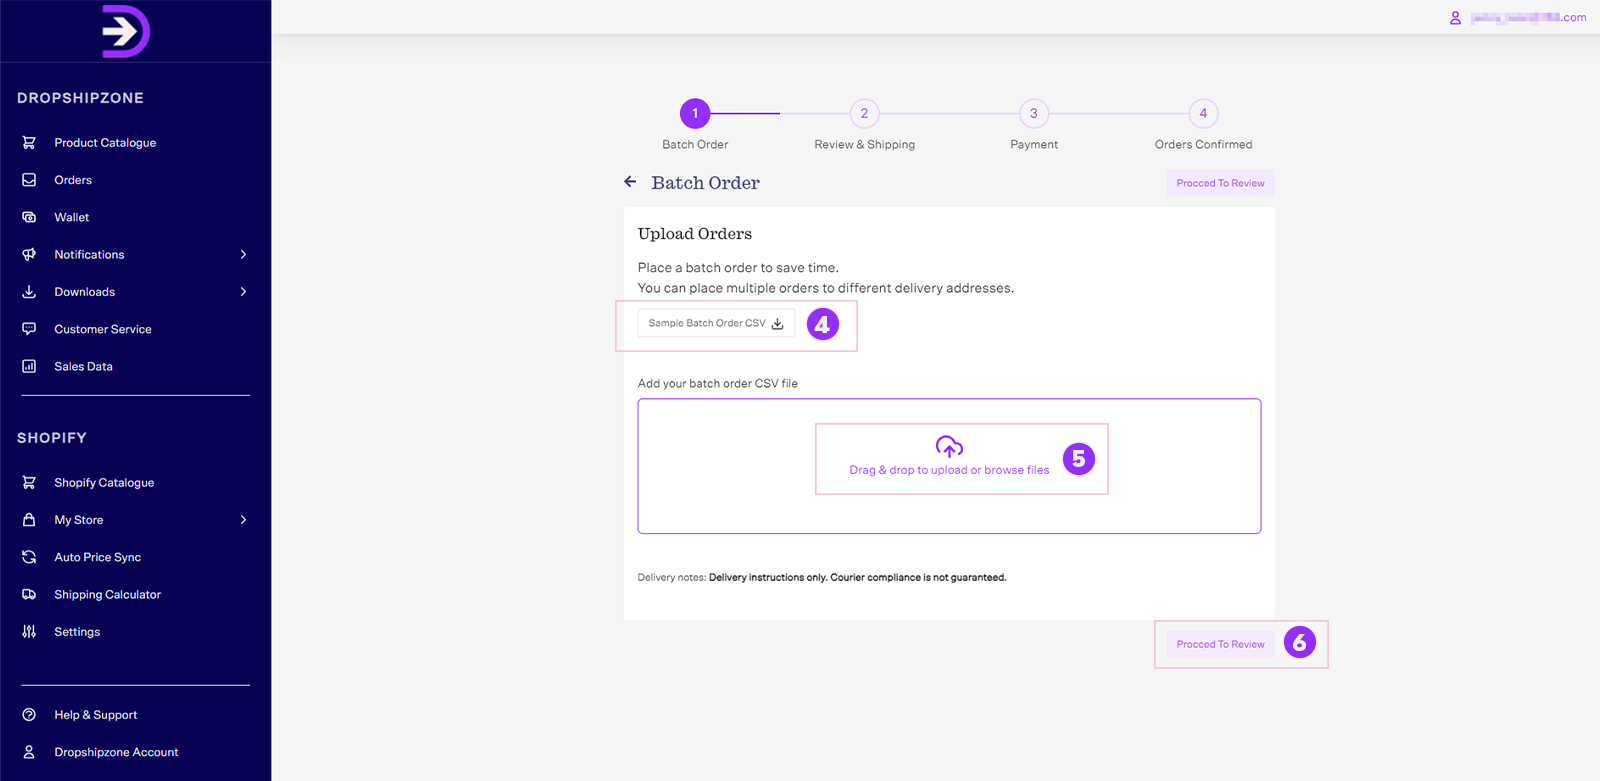
- Click on the Batch Orders option, followed by clicking on the Sample batch order CSV button to retrieve the sample order file.
- Create an order file containing all your customer orders in a format that matches the sample order file and upload it in the csv format using the Browse button or Drag & Drop option.
- Click Proceed to Review to review your batch order. On the next page, you’ll see all your orders with their upload status. If your order was not successfully submitted, you’ll see an Unsuccessful Upload status, prompting you to review your orders.
Please note that you can only select one file at a time, as Dropshipzone processes orders individually.
Regardless of how you place orders, you’ll be directed to the shipping & payment page after you submit your order.
How do I set up Auto Order Sync for my Shopify store?
The Dropshipzone app on Shopify has an Auto Order Sync function designed to enable Retailers to effortlessly sync incoming orders and improve order management. It helps ensure accurate and real-time updates.
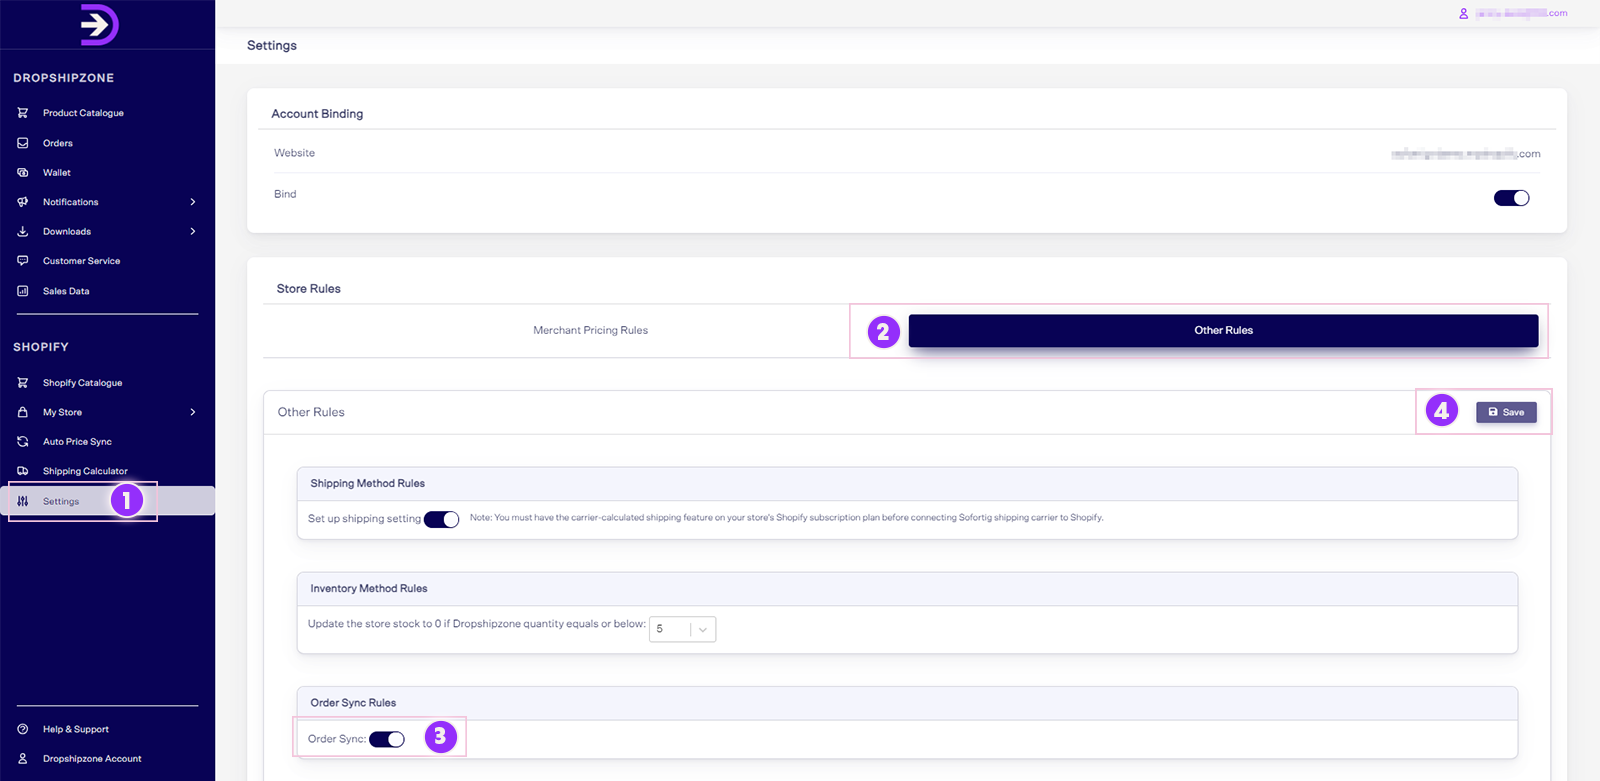
- To set up the Auto Order Sync function, navigate to Settings and click Other Rules.
- Move to the Order Sync Rules setting and click the button to enable the Order Sync function.
- Click Save to confirm your selections. All incoming orders will be tagged as DSZ within your Shopify account once the Auto Order Sync function is enabled. Head over to the Orders page to review these orders.
- Your Shopify orders will take up to 30 minutes to be synced to Dropshipzone. Suppliers will be notified for fulfillment once the order is paid. You will receive an email notification to confirm successful order syncing.
You can even manually place the order by accessing the Orders page if order syncing doesn’t work as intended, ensuring a consistent and efficient ordering process.
How do I pay for my orders?
You’ll need to make a full payment to confirm your order. Here’s how you can make payments for your orders.
Please note all your submitted orders will be under the All Orders tab and Payment Required tab within the Orders page.
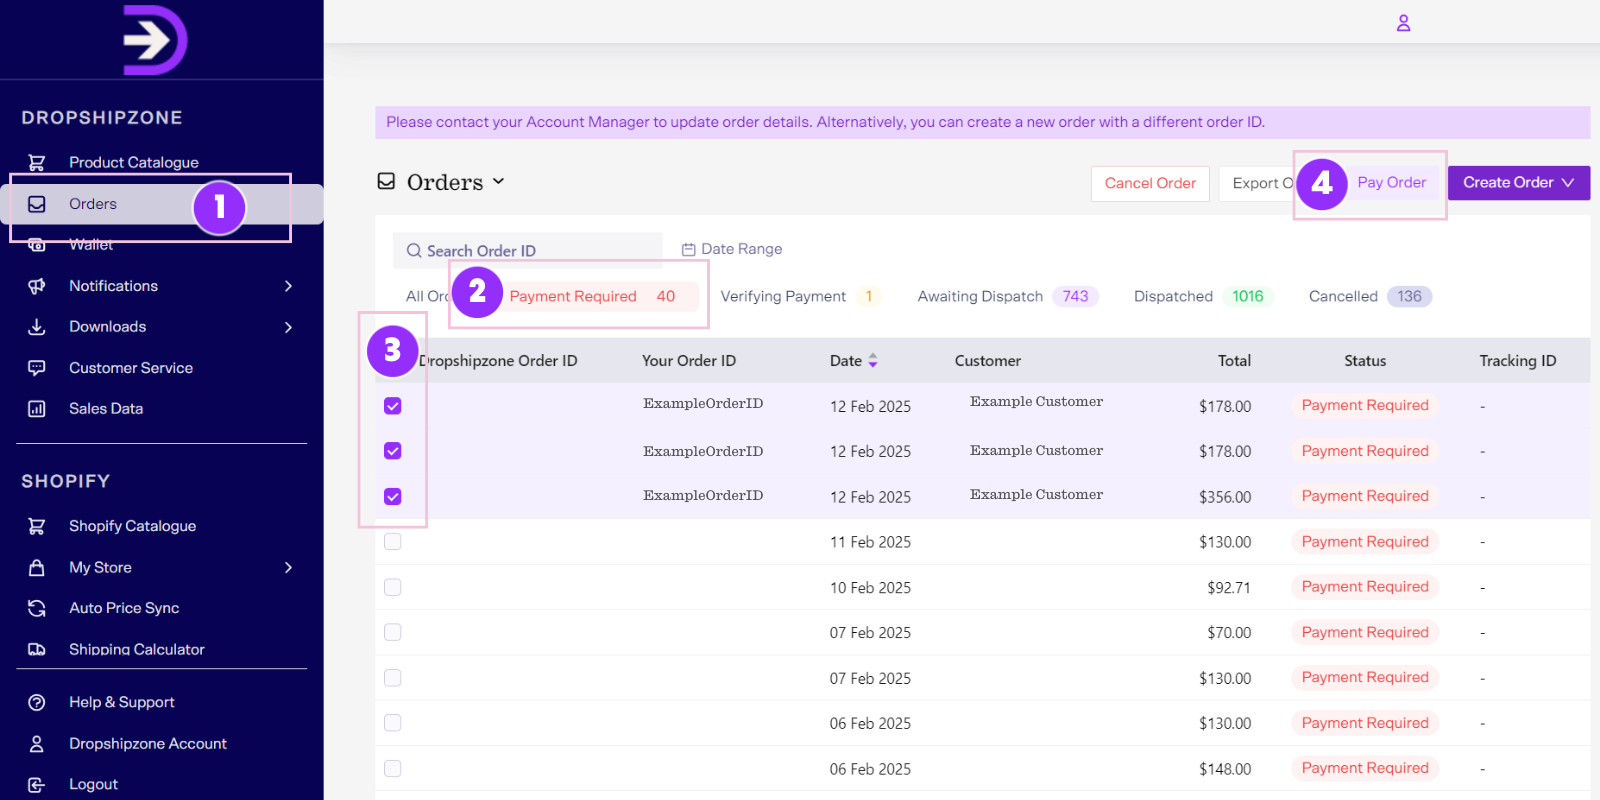
- Select up to 20 orders that you want to make a payment for and click Pay Order at the top right.
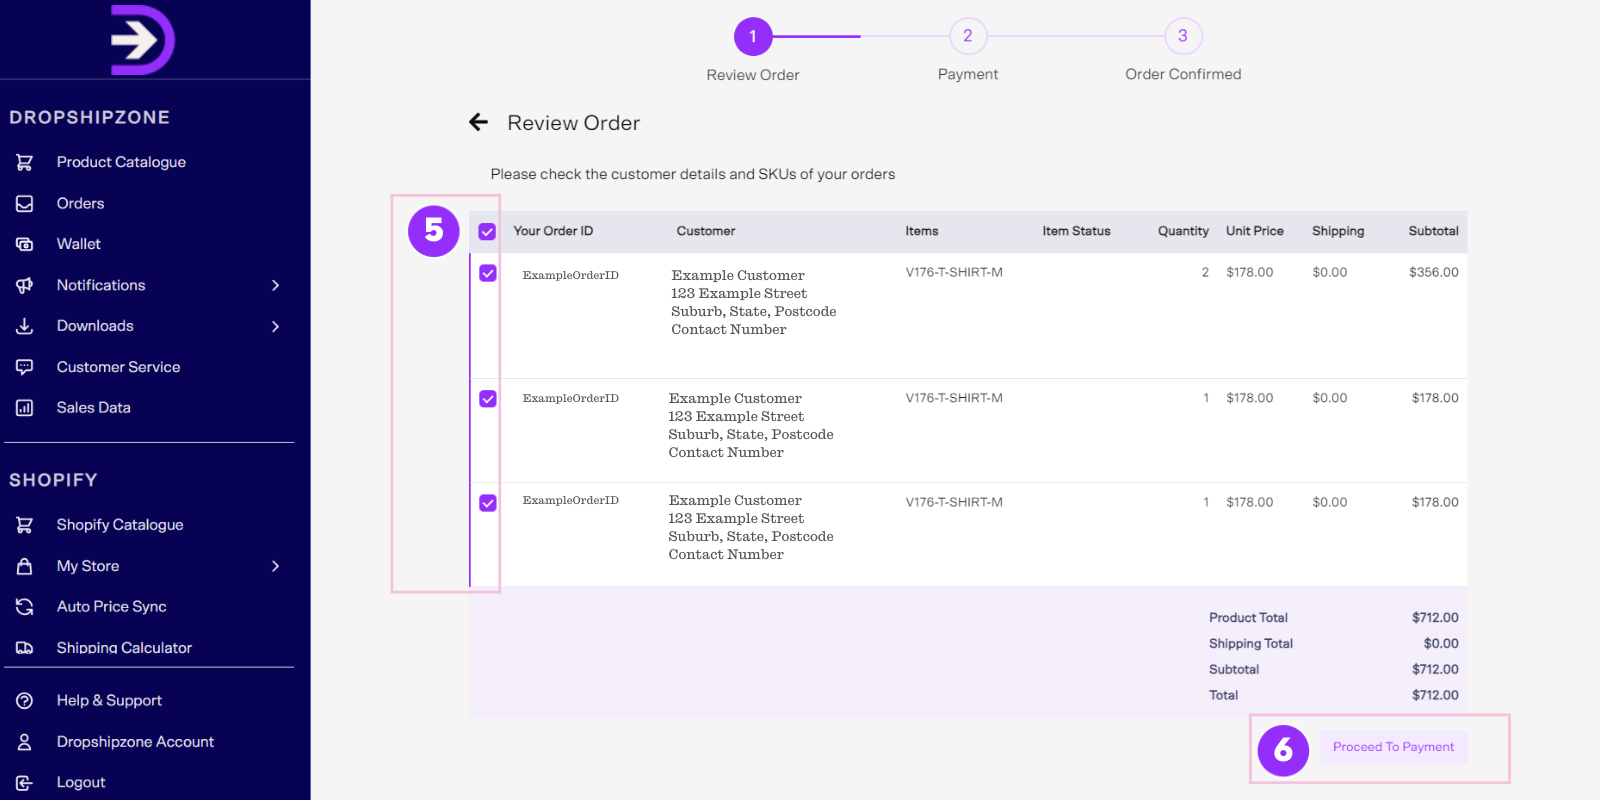
- Verify delivery address, shipping cost, and billing details. If you select multiple orders to pay together, order information for each Supplier will be displayed for you to review.
- Click Proceed To Payment to view payment options.
Dropshipzone gives you the flexibility to either use a credit card, wallet or PayPal to make payments. Please be aware that payments made with credit card or PayPal will incur a 1.1% processing fee.
Pay by credit card
Payments made by credit card will incur a 1.1% processing fee. If you choose to pay with credit card, follow these steps:
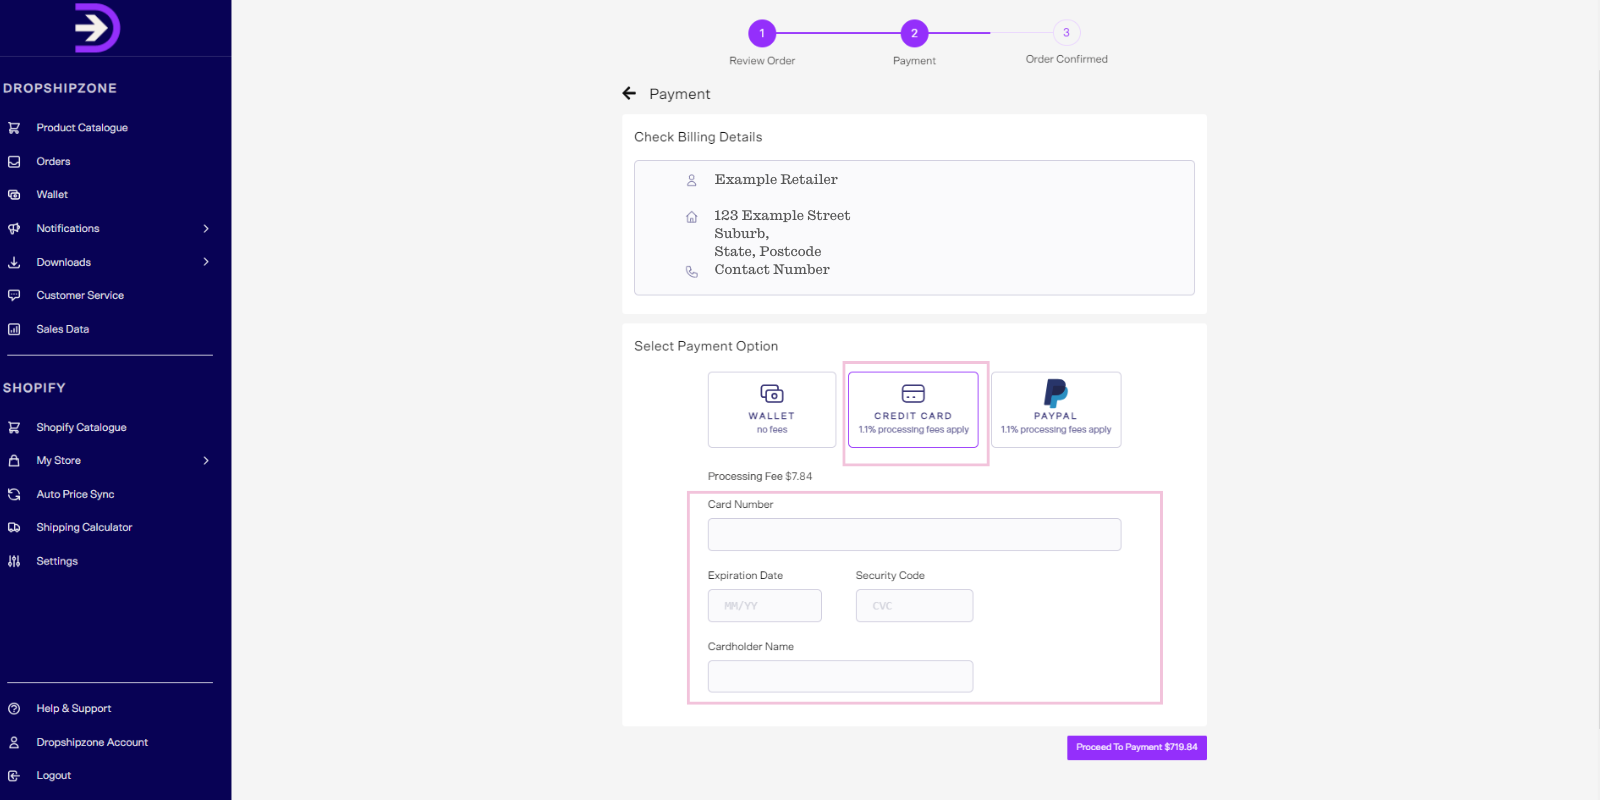
- Enter your credit card details such as card number, expiration date, security code, and cardholder name.
- Click on the Proceed To Payment button.
Pay by Wallet
Payments made by your wallet will not incur any processing fees. If you choose to pay with your Wallet, follow these steps.

- Select Wallet and click Add Credit to top up your balance.
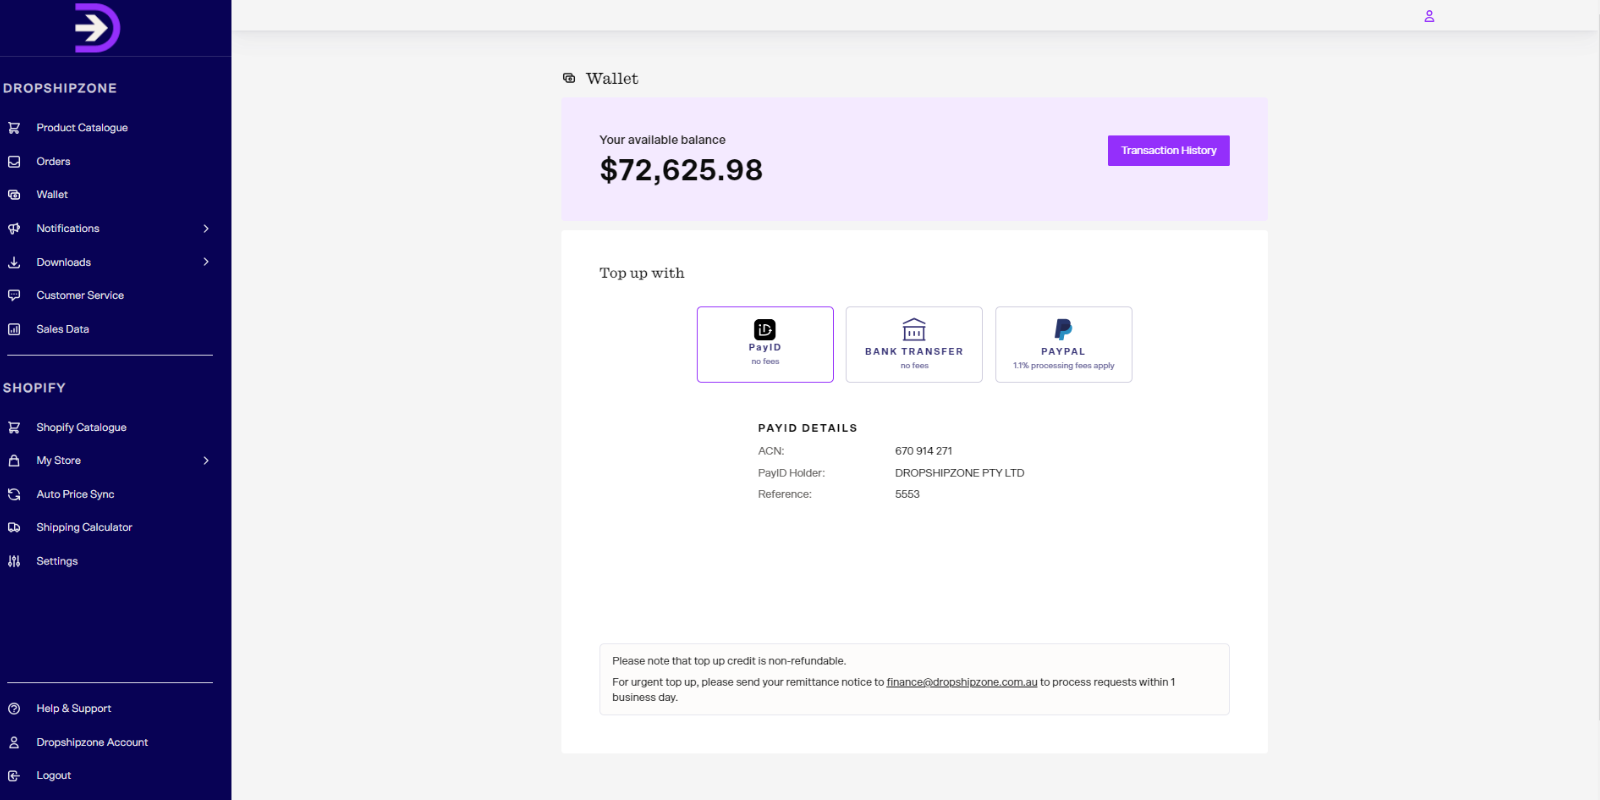

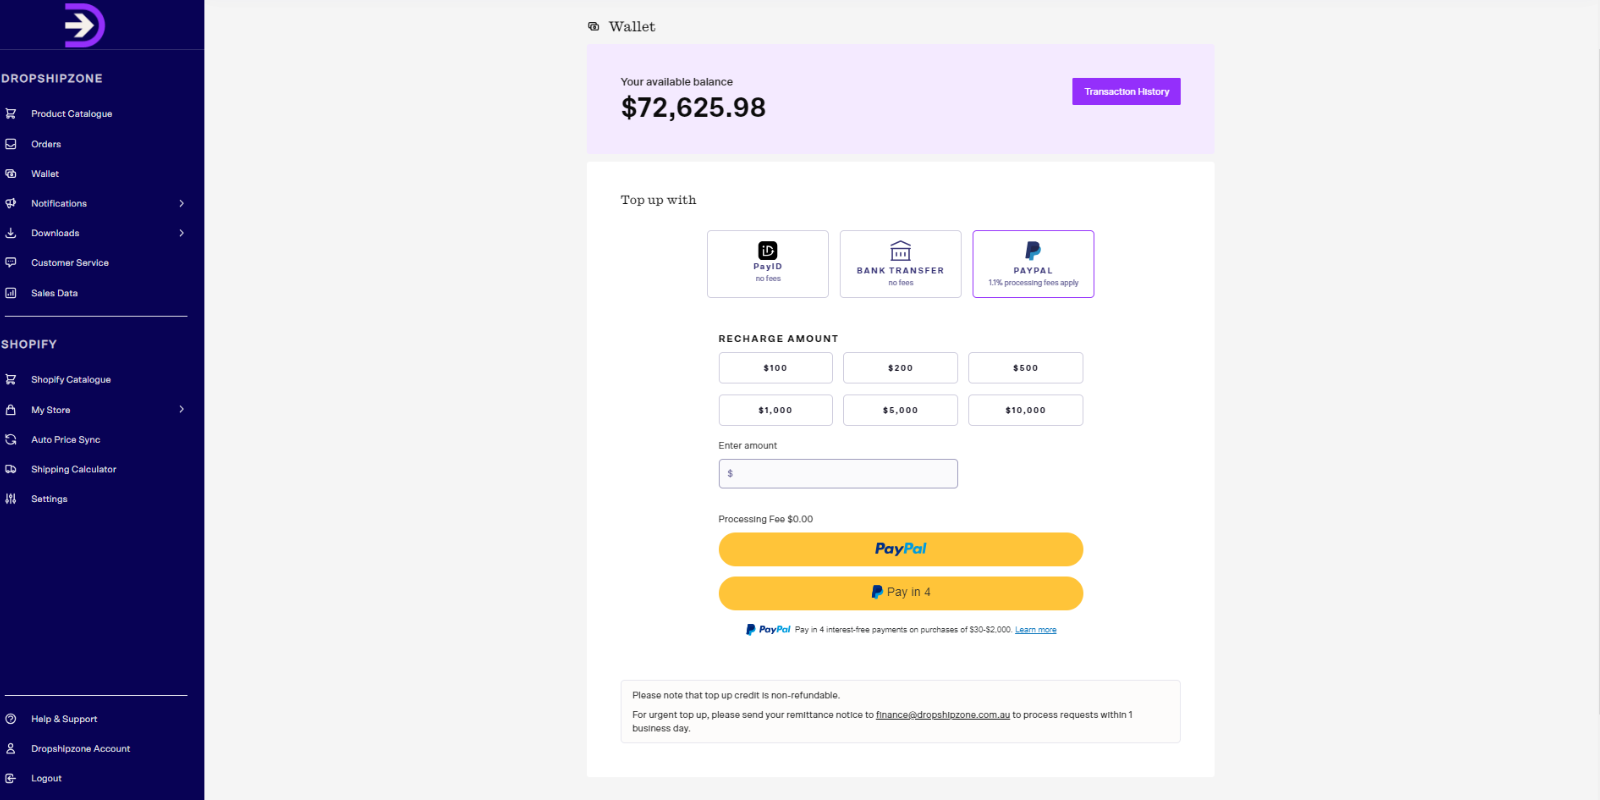
- You can either choose to top up via bank transfer, PayID or PayPal. Please note top ups via PayPal will incur a 1.1% processing fee.
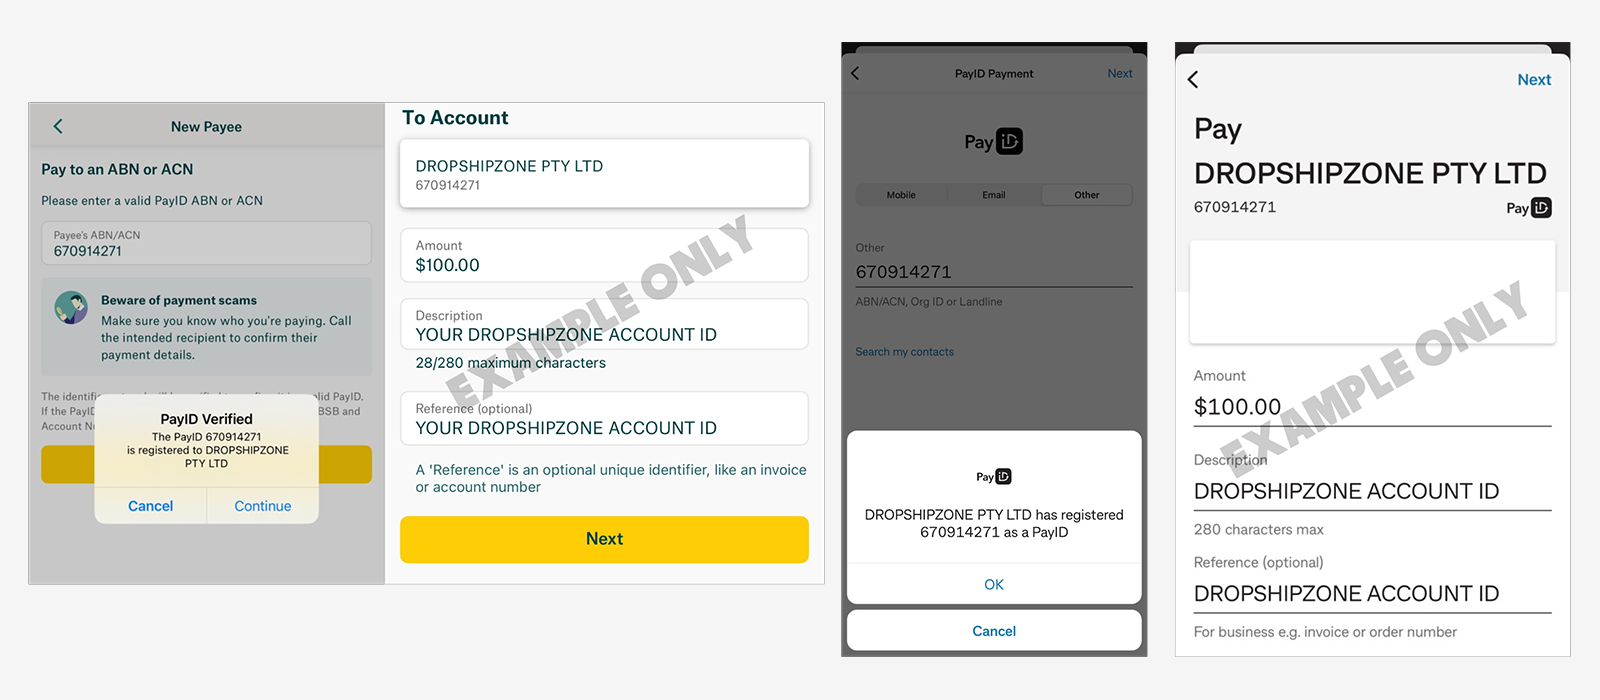
3. If you choose to top up via PayID, enter the ACN: 670914 271. The PayID holder details will display as DROPSHIPZONE PTY LTD. Please add your Dropshipzone Account ID in the Reference section. Failure to provide your Dropshipzone Account ID in the reference section may result in a delayed top up.
Once your account has been successfully topped up, please send the receipt of payment to finance@dropshipzone.com.au. Your account will be topped up within 1 business day after payment confirmation.
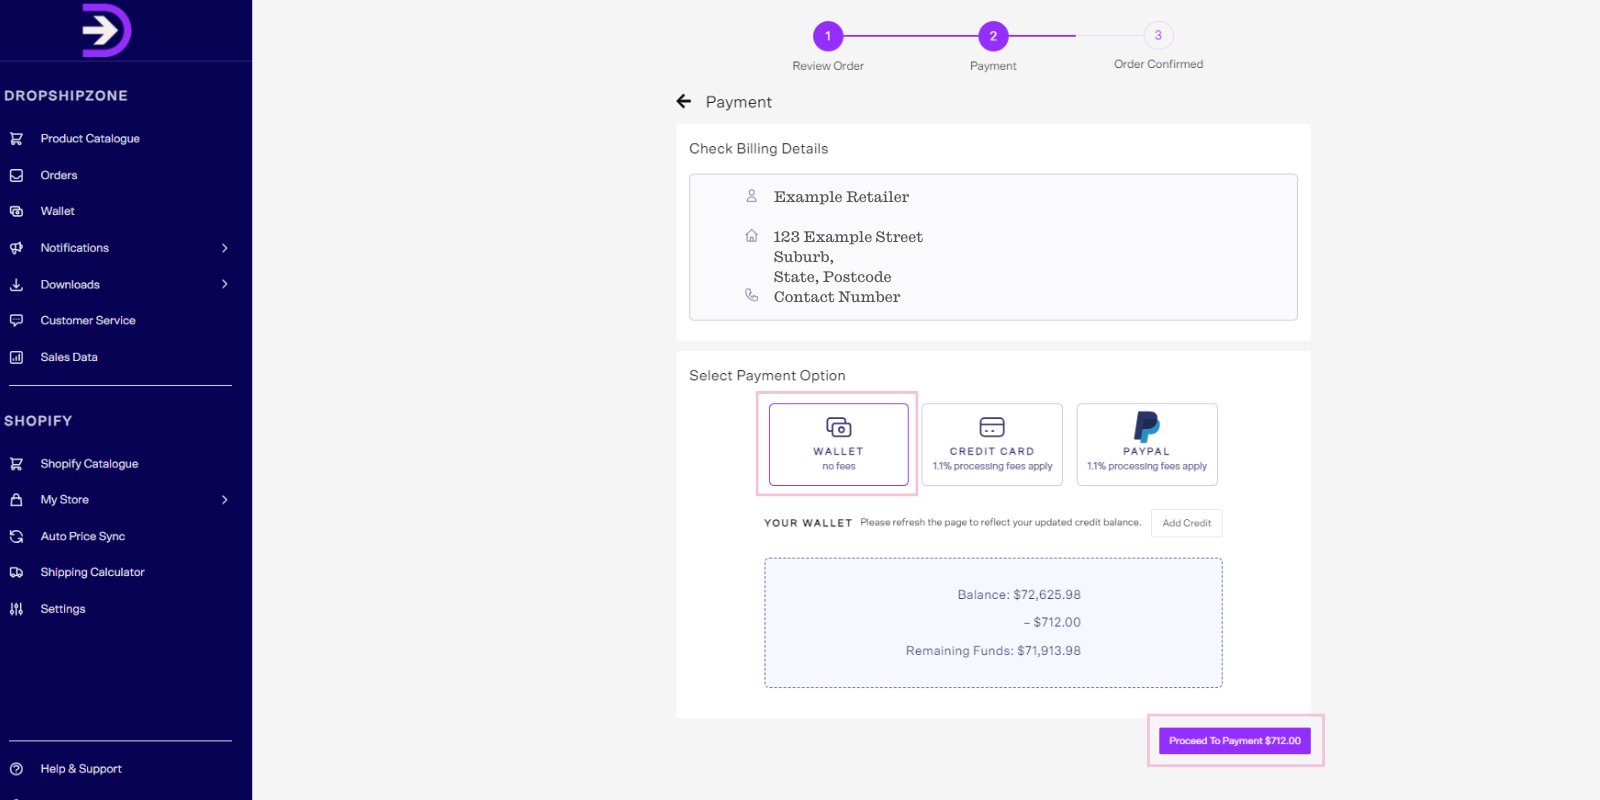
4. After you’ve successfully topped up your Wallet, select Wallet as your payment option. Here, you can check your balance amount and payment details. Then, click on the Proceed To Payment button at the bottom of the page.
Checking your wallet recharge history
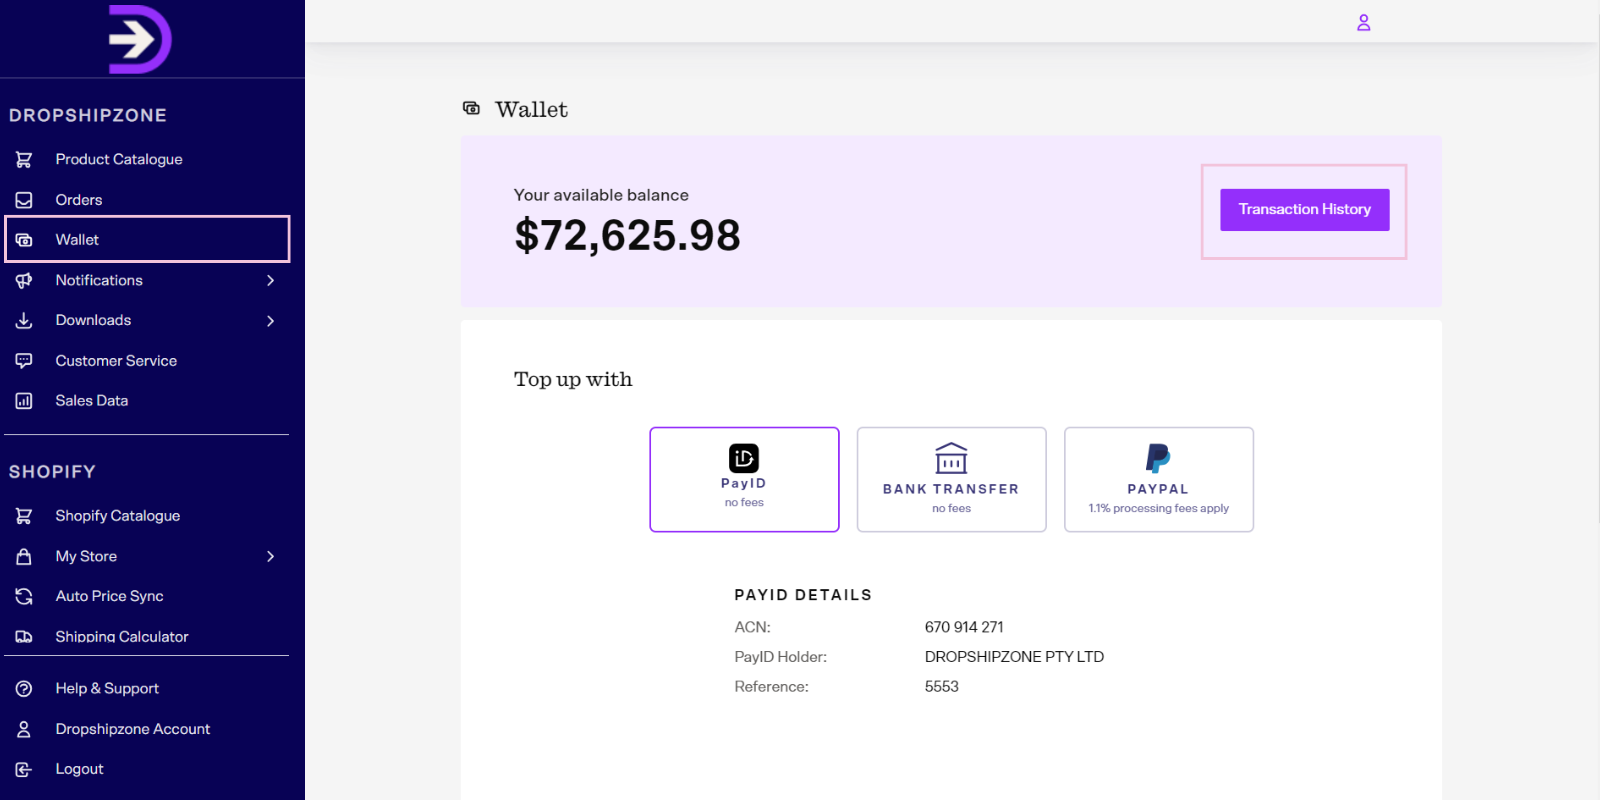
1. To check your top up history, navigate to Wallet in the menu bar. From here click Transaction History next to your available balance.
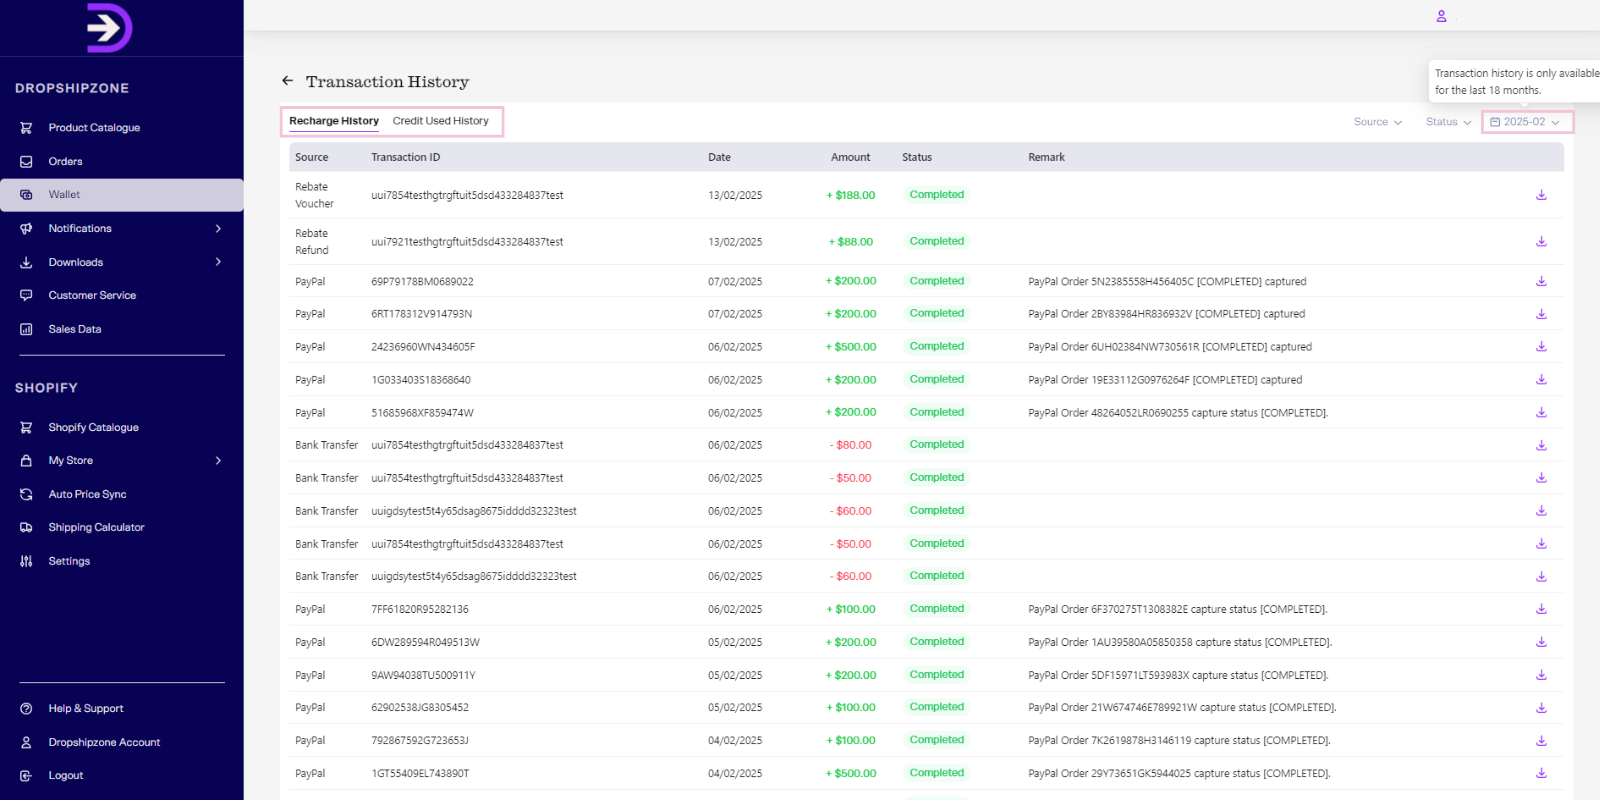
2. To check your transaction history you can either click the Recharge History Tab or the Credit Used History tab. Your transaction history will only show the last 18 months of activity. You can filter transactions by date by clicking on the date filter on the top right of the table.
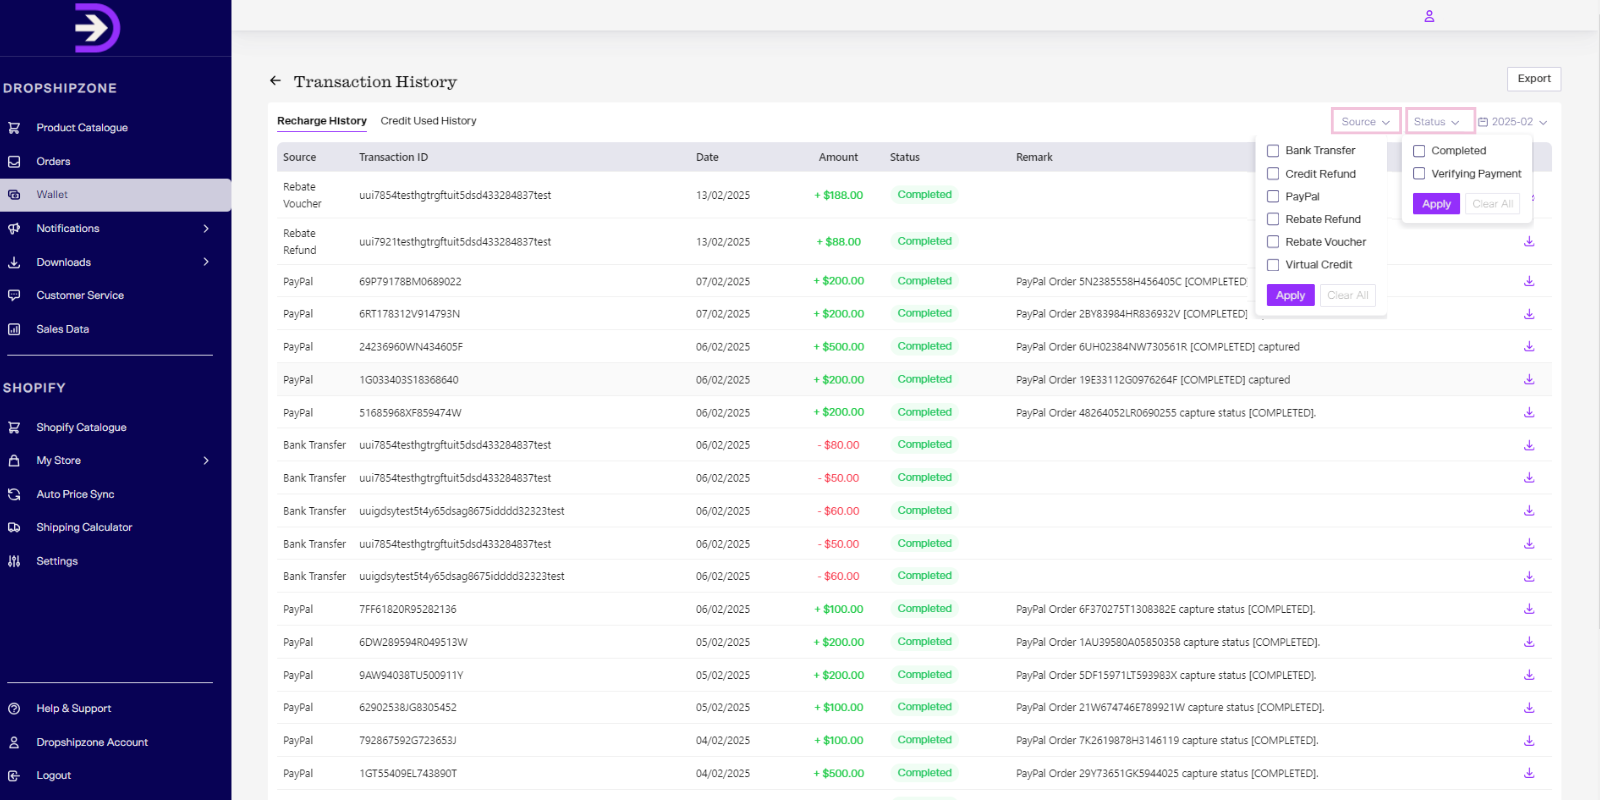
3. Recharge History transactions are able to be filtered by top up source. Click the Source filter on the top right of the table to see a drop-down of options. Additionally to this, you can also filter Recharge History transactions by Completed or Verifying Payment status. Click the Status filter on the top right of the table to see a drop-down of options.

4. To export your transaction history, click the Export button. The system will export your transaction history in a CSV file.
Pay via PayPal
Payments made via PayPal will incur a 1.1% processing fee. If you choose to pay with PayPal, follow these steps:
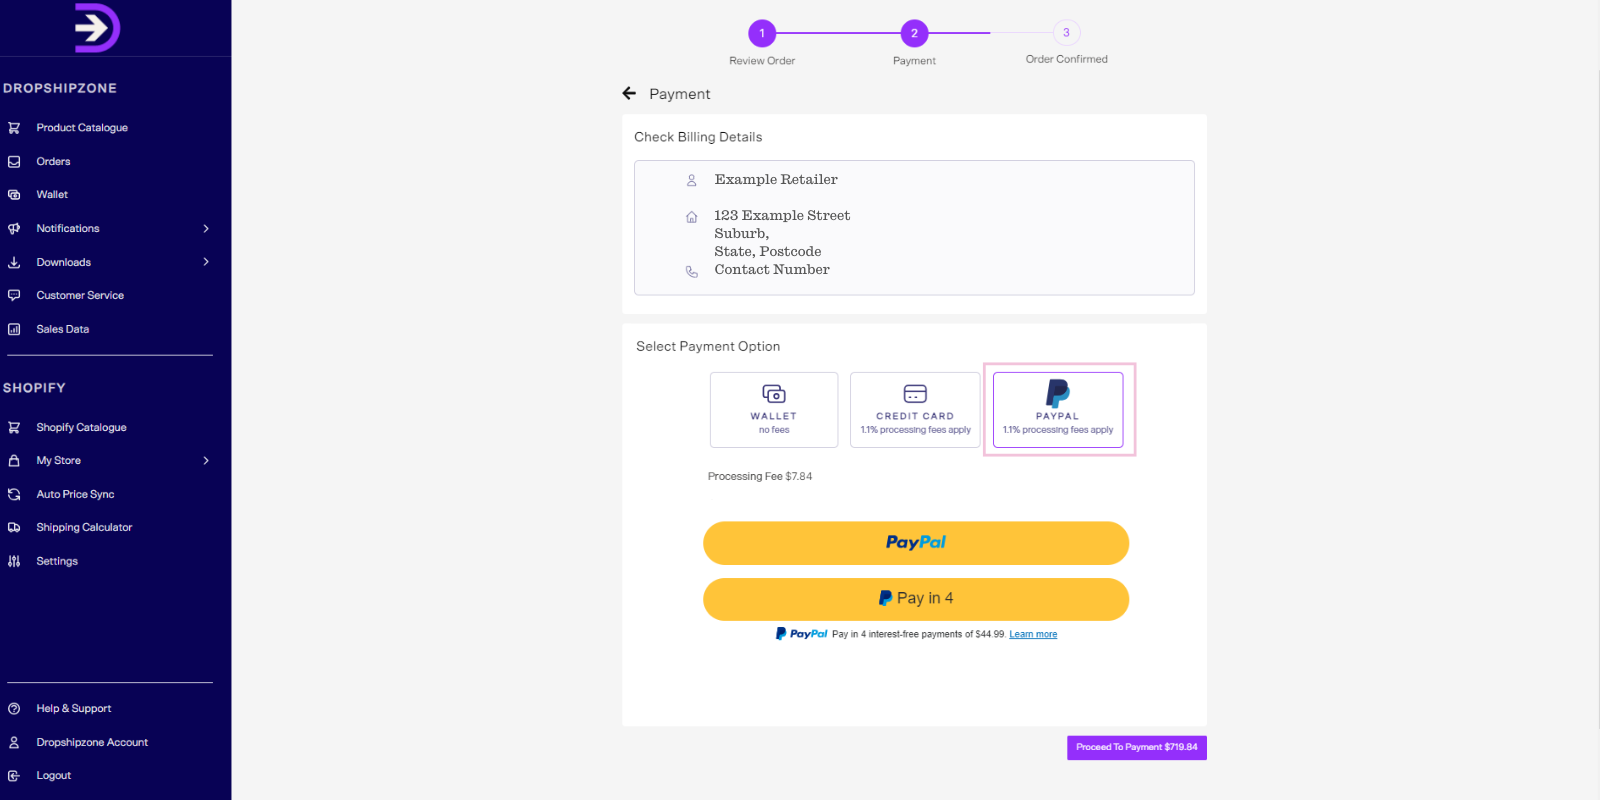
- Select the PayPal payment method. Then, you’ll see two options - PayPal for full payment or to pay in 4. Click on the preferred option, and you’ll be redirected to the PayPal website. Follow the instructions to complete the payment.
Please note that a PayPal surcharge fee may apply.
2. Click Complete Purchase to finalise your payment.
Please be informed that it generally takes 1-2 days for the payment to process. If you don’t complete the payment, your order will be moved to the Payment Required tab within the Orders page.
Your order will be dispatched only upon completion of full payment. We’ll send you an email after payment confirmation. Once your order is dispatched from our distribution centre, you will receive a shipment email with the tracking details.
Note: If you encounter issues paying with these payment methods, kindly contact your Account Manager for an alternative payment method.
How do I cancel my orders?
Your unpaid orders will be automatically cancelled and moved to the Cancelled tab after 7 days. However, if you'd like to cancel your unpaid orders immediately, follow these steps:
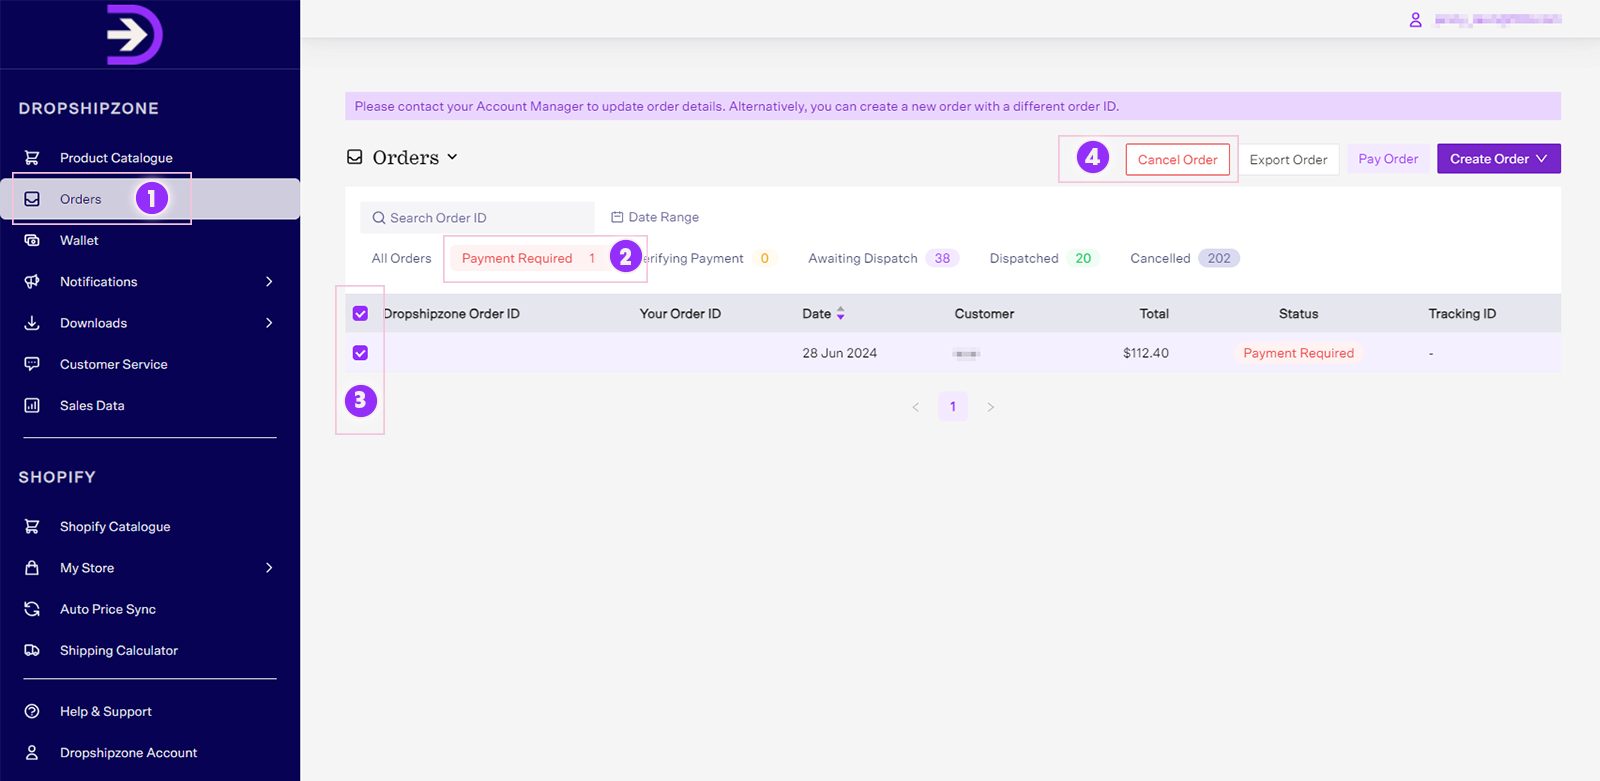
- Navigate to the Payment Required tab within the Orders page.
- Select the order(s) you want to cancel and click the Cancel Order button at the top right.
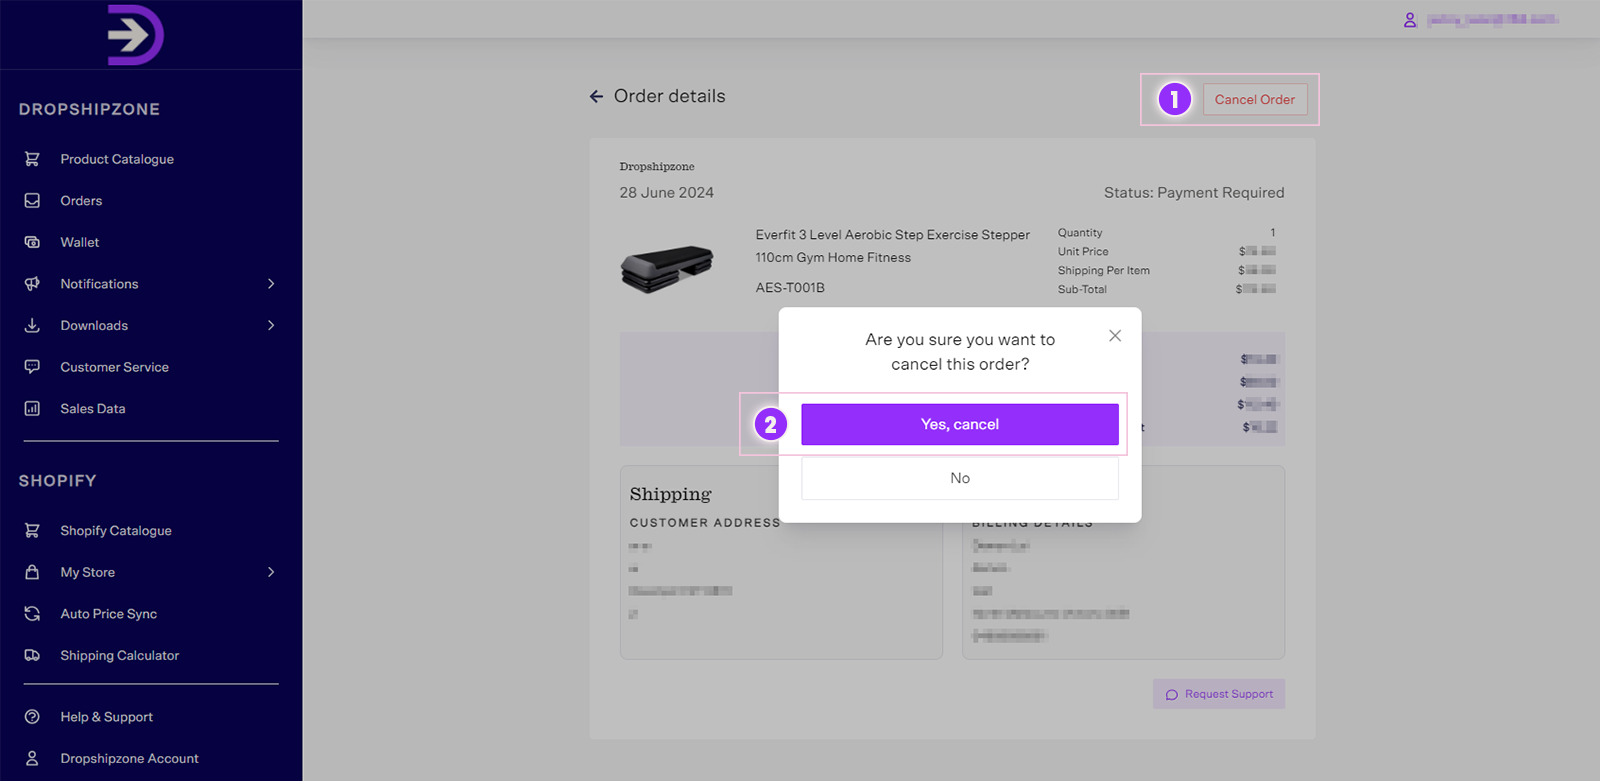
3. Alternatively, click on the order to go to the Order Details page and cancel your order from there.
You'll receive a pop-up notification to confirm the cancellation. Click 'Yes, cancel' to successfully cancel the order, which will then move to the Cancelled tab.
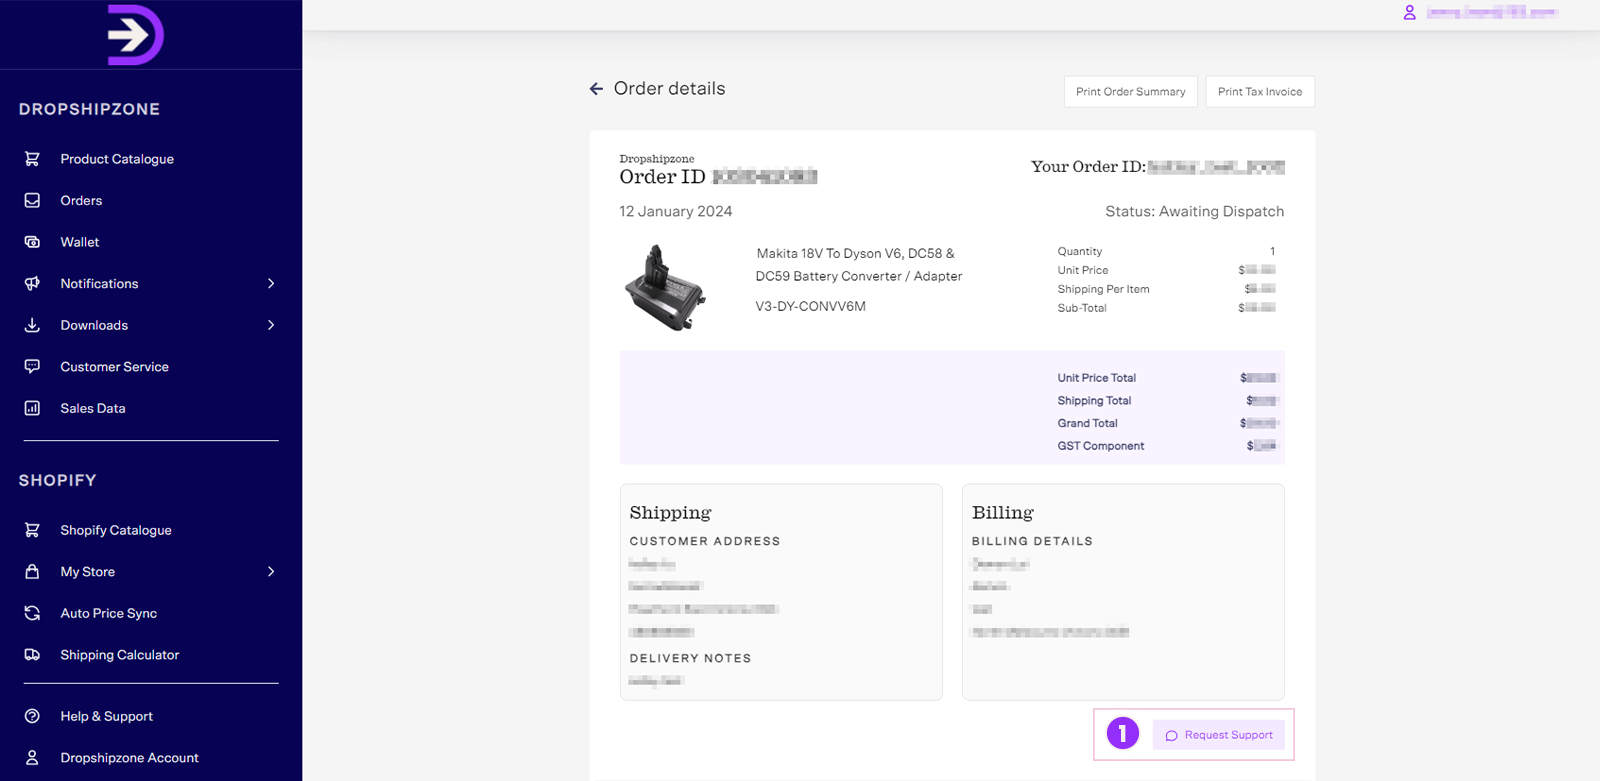
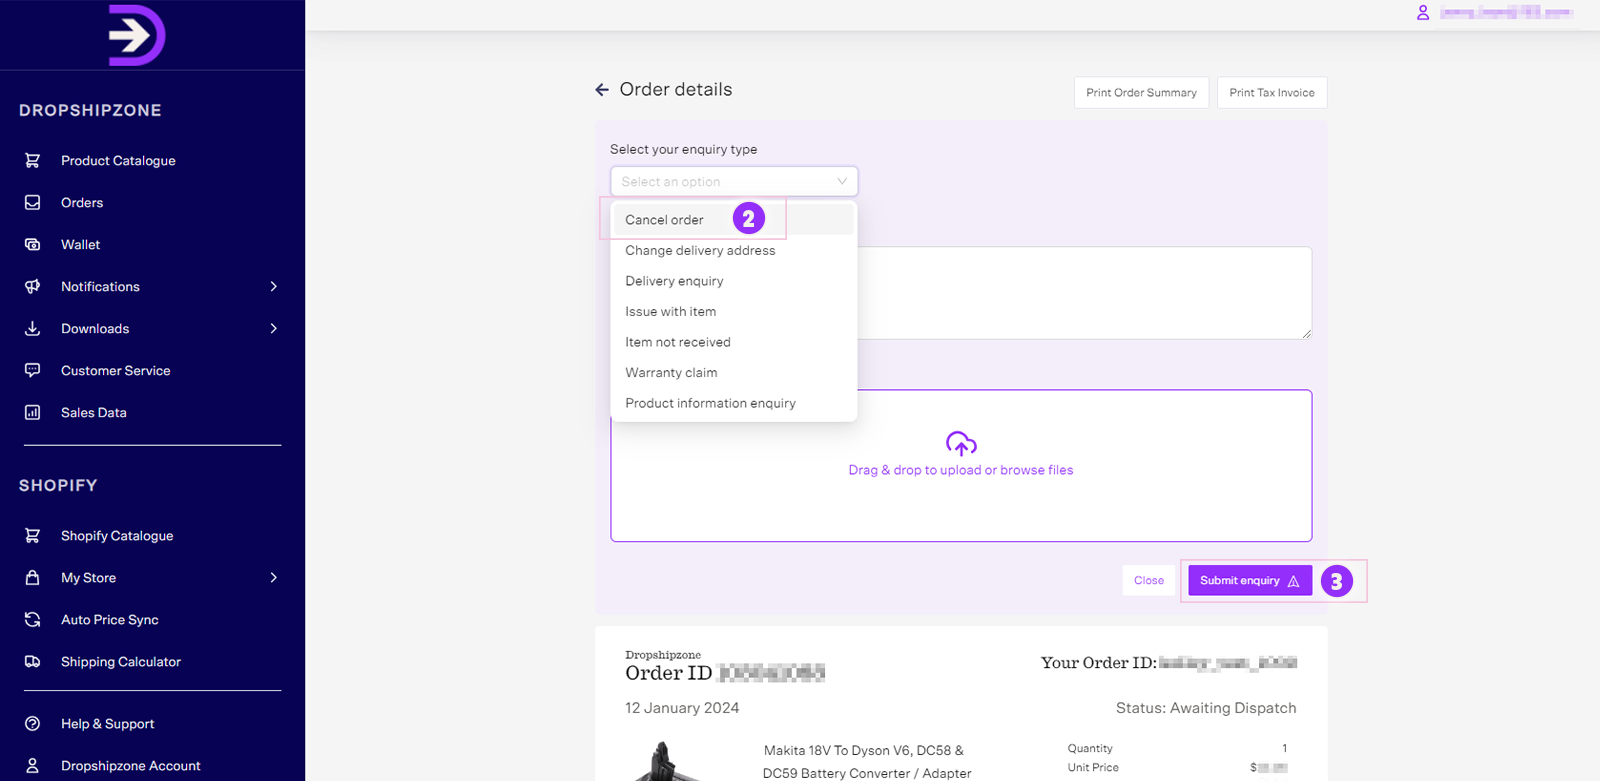
To cancel your paid orders, please note that you'll need to contact your Dropshipzone Account Manager or submit a request to cancel the order by accessing the Request Support button on the Order Details page. Simply select Cancel the order from the drop-down list, add enquiry notes or attachments if available, and click Submit enquiry to send your request for order cancellation.
How do I check my order status and order history?
To check the status of your orders, follow these steps:
- Navigate to the Orders tab and click All Orders to see a comprehensive view of all orders at different stages.
- Click Payment Required to view unpaid orders or orders with unsuccessful payments.
- Orders, if paid via PayPal, will be under Verifying Payment until finalised. This status indicates that PayPal is either checking the payment or the payment process wasn't completed.
If the payment isn't received after the system check, the order status will revert to Payment Required. Please wait a few hours for the status to change to Payment Required before attempting to repay. If the status remains Verifying Payment for more than a day, please contact your Account Manager for further assistance. Please note that you’ll receive a Dropshipzone Order ID upon payment confirmation.
- After the PayPal system validates the payment and Dropshipzone confirms receipt of the payment, the paid orders will be moved to the Awaiting Dispatch tab.
- After the orders are dispatched from the Supplier’s warehouse, your orders will be moved to the Dispatched tab.
- If you’d like to review cancelled orders, you can find them under the Cancelled tab.
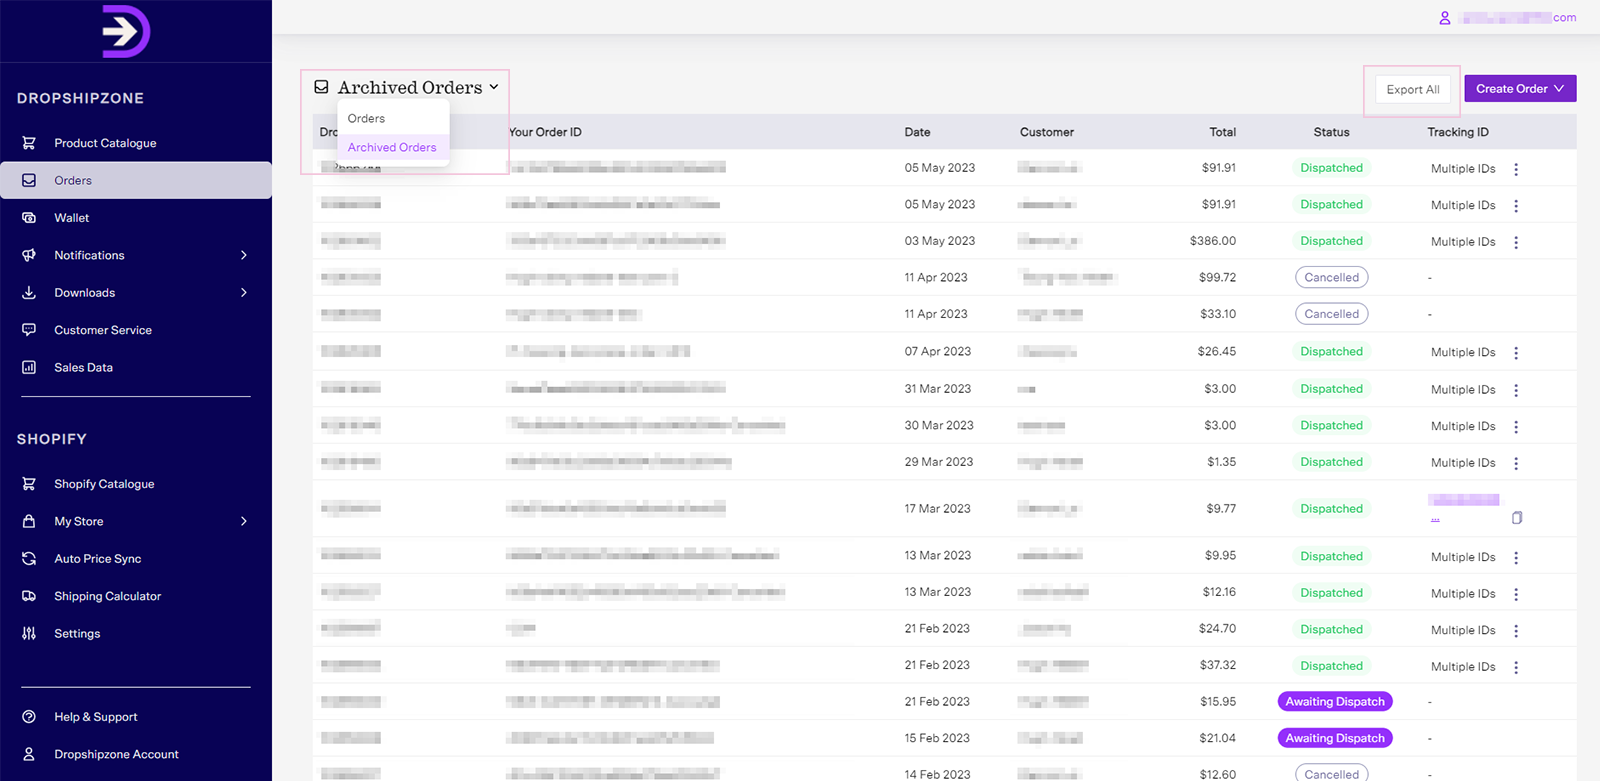
Note: You can check your order history for the past 12 months under the 'Orders' tab. For orders older than 12 months, simply click on the 'Archived Orders' tab.
How do I enable the Automatically Fulfill Orders function for my Shopify store?
Learn how to enable the Automatically Fulfill Orders function for your Shopify store to streamline order processing.
Note: Auto Order Sync function needs to be manually turned on to use the Automatically Fulfill Orders function.
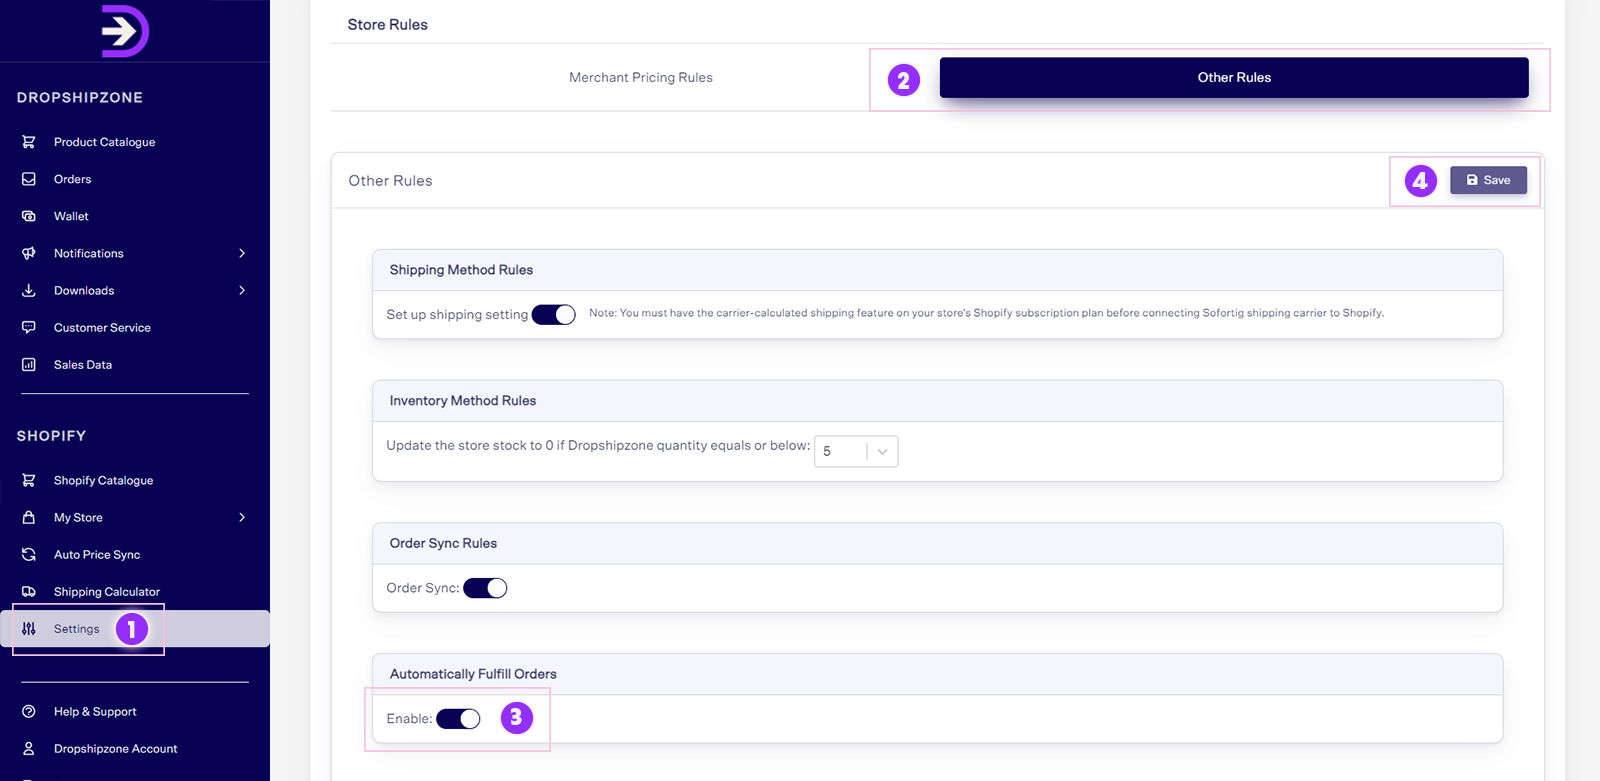
- Navigate to the Settings section and click Other Rules.
- Move to the Automatically Fulfill Orders setting and click the button to enable this function.
- Click Save to confirm your selections.
When the tracking information is available on Dropshipzone, it will seamlessly reflect on your Shopify store. You can check order updates on your Shopify store's order timeline. A shipping confirmation email will be sent to your customers.
You can even customise the tracking confirmation email template within your Shopify account. Simply navigate to Settings in your Shopify account, proceed to Notifications, and select Shipping. From there, click on Shipping Confirmation to tailor the email template to your preferences.
Note: Only orders with the “Unfulfilled” status on Shopify will be synced to the Dropshipzone app on Shopify. Any orders that are created manually through the Retailer portal, will not have tracking synced back to Retailers Shopify's stores.
Frequently asked questions

If an order contains multiple items, use the same order ID for all items.
Kindly contact your Dropshipzone Account Manager for any issues related to order placement. You can identify the type of error encountered during order placement by clicking on the alert icon.
Our system automatically detects duplicate orders based on your order ID, provided the SKU is valid, stock is sufficient, and the shipping details are accurate. If you receive an error message during order placement, kindly send a screenshot of the error related to your order to your Account Manager for swift resolution.
If your payment status hasn’t been updated, please be patient as delays may occur. Avoid initiating another payment to prevent duplicate transactions. Making multiple payments without status updates may raise fraud suspicions and lead to delays in dispatch.
While we strive to cancel or initiate a Return to Sender request for fraudulent orders, there’s no guarantee. A restocking fee may apply for orders dispatched with tracking. Kindly refer to articles from Shopify, BigCommerce, and PayPal for valuable tips and tricks on how you can prevent fraudulent orders.
If you’ve made a duplicate payment, kindly contact your Dropshipzone Account Manager or reach out via Customer Service portal and provide your Dropshipzone order ID and your PayPal transaction ID. Our team will follow up on this request and refund the amount within 2-3 business days upon confirmation. We advise you to not open a PayPal dispute, as PayPal will hold the money until the investigation is done, which may usually take 10 business days and cause unnecessary delays.
There are several reasons why the Auto Order Sync function may not work as intended, including if the order contains SKUs from other suppliers (Not Dropshipzone Suppliers) or if there are any tips on the orders. Shopify allows retailers to set up tipping options for online orders. Read more about it here.
The Auto Order Sync function in the Dropshipzone Shopify app helps ensure that any new orders placed on your Shopify store are automatically synced to Dropshipzone. You can find these orders under the All Orders and Payment Required tabs. Your orders will be transferred to Dropshipzone Suppliers after the full payment has been made.
On the other hand, the Automatically Fulfill Orders function allows the Dropshipzone app to automatically sync tracking information to your Shopify store once orders are dispatched from the Supplier’s warehouse. The orders will be automatically marked as “Fulfilled’ on your Shopify store. Read about how shipping works here.
To update the delivery address for your orders, follow these steps:
- Navigate to the Orders tab and click on the order you want to change the delivery address for.
- Click on the Request Support button and select Change the delivery address from the drop-down list. You can even add enquiry notes or attachments, if available.
- Click Submit enquiry to submit your request.
Please note that your submitted/unpaid orders will be automatically cancelled within 7 days. You’ll find these orders under the Cancelled status. If you still wish to proceed with your order, you'll need to place a new order on the website.
Please note that the Not submitted and Unpaid order statuses have been merged into a new status Payment Required. You can now find your ‘Not submitted’ orders under Payment Required.
All the orders placed before the new Retailer Portal launch will be reflected on the new portal.
You can easily view and export tracking information by navigating to the Orders page. Click on Dispatched and navigate to the Tracking ID section. Click on the provided tracking IDs to track a parcel, or you can even use the copy icon to copy the tracking IDs.
To download your order invoice, go to the Orders page and click on the specific Order ID. From there, click Print order summary at the top right corner to download your order summary. To download your tax invoice, click on the Print Tax Invoice button.
Your monthly sales data is conveniently available in the Sales Data tab within the Dropshipzone section. This page offers insights into your monthly best sellers and sales comparison, as well as your top 10 categories, top 10 brands, and top 10 SKUs.
Head to the Downloads tab and click Monthly Invoices. Choose the desired month and year, then click Export. Please note that monthly invoice records are accessible for the past 25 months only. For accurate bookkeeping, we recommend downloading invoices monthly.


