
In this section, we’ll discuss how shipping works on Dropshipzone, how that relates to your obligations as a Dropshipzone Supplier, and how to check the status of Retailer orders.
How does shipping work?
As a Dropshipzone Supplier, you select your courier and set your own shipping rates. When uploading your products, you will be asked to fill out the shipping rates for each of our shipping zones based on Postcode Zone Mapping.
After your order ships, you will need to provide the tracking number to Dropshipzone as supplied by your courier. This is required within 2 business days of receiving an order.
What is Postcode Zone Mapping and why is it important for shipping?

Dropshipzone offers three distinct shipping zone options to suit your business needs. You can choose from Standard (16 Zones) , Defined (34 Zones) or Advanced (115 zones) shipping zones to gain more granular control and flexibility when setting up your shipping rates. Furthermore, if you offer delivery to New Zealand, you can configure the corresponding shipping rates accordingly.
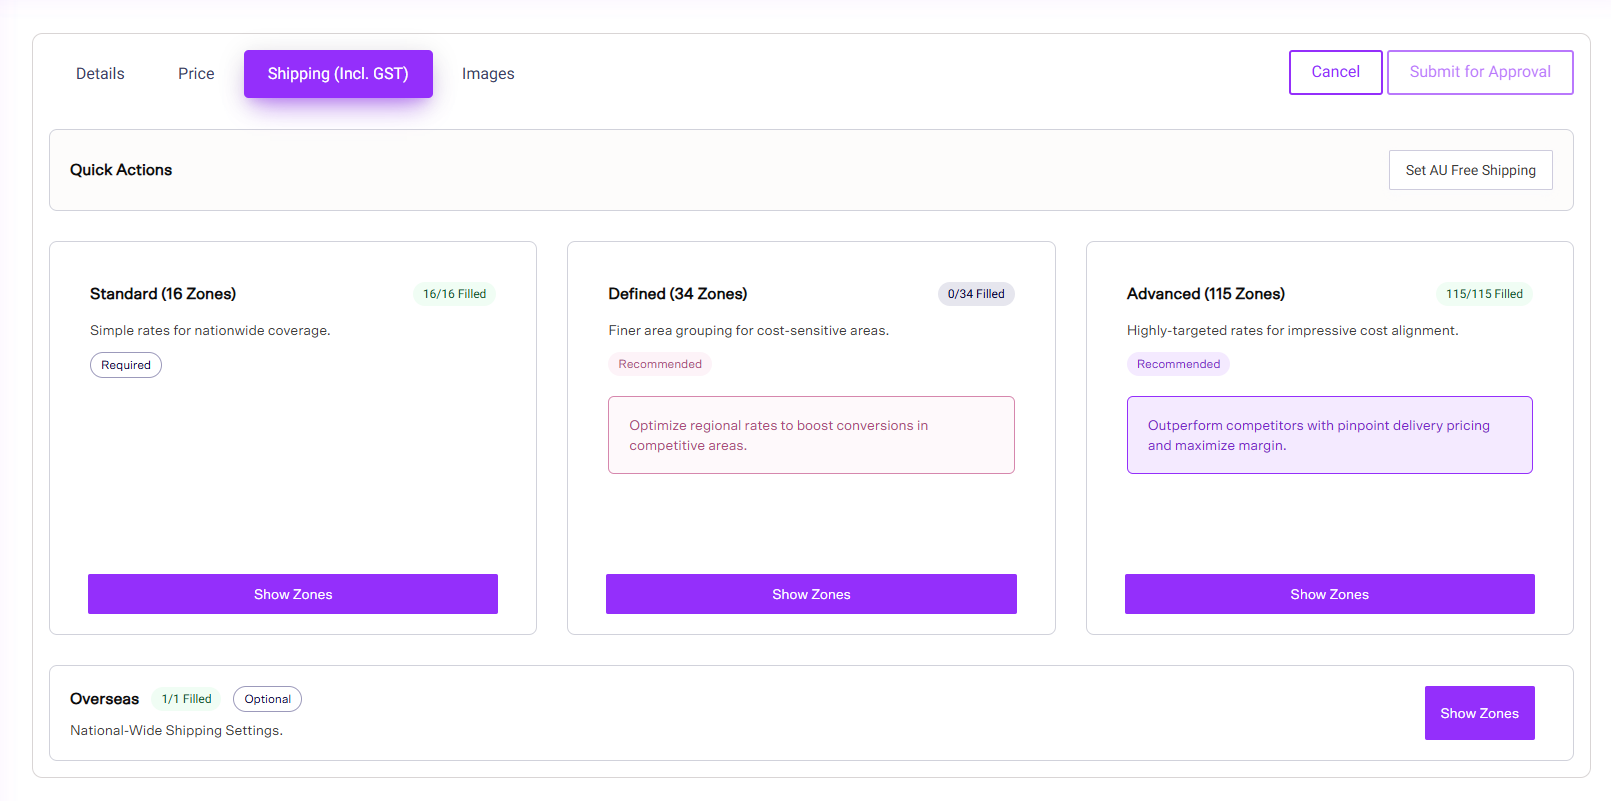
The Standard (16 Zones) option is required, providing simple rates for nationwide coverage. For these zones, shipping rates are often split between metro and regional areas, as defined by their size and population.
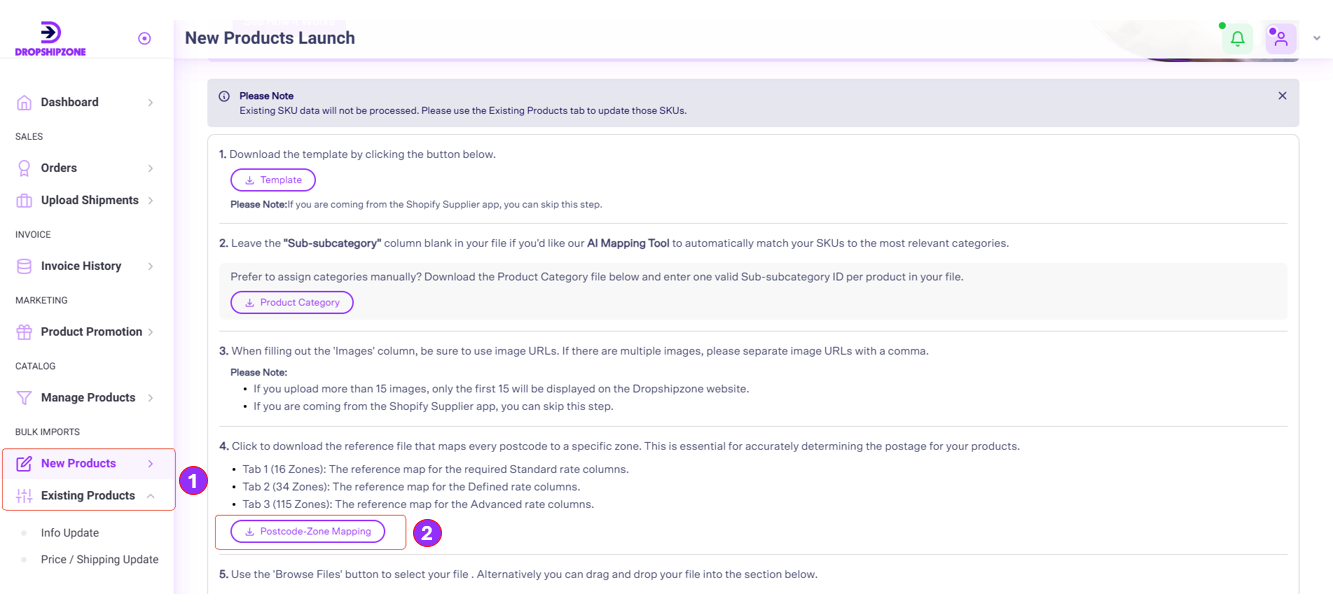
Our zoning system is designed to aid Suppliers and Retailers in calculating shipping fees. You can see these zones by downloading the Postcode-Zone Mapping template, which can be found under Bulk Imports > New Products or Bulk Imports > Existing Products > Price/Shipping Update.

How to calculate your shipping fees
One method to calculate shipping fees is to take the shipping cost for each postcode under the relevant shipping zone, and then calculate the average shipping rate across postcodes. This is the recommended strategy for Dropshipzone.
Can I provide free shipping?
Yes. Dropshipzone recommends offering free shipping on smaller items. It can also help you stay competitive in a growing market. By offering free shipping, you enable Retailers to do the same, helping further drive sales.
You can now easily set up free shipping on a per-product basis using the quick-setup free shipping option on the Product Editing Page.

What if the shipping cost is too high for certain postcodes?
We understand that some Australian postcodes are undeliverable for some SKUs due to prohibitive shipping rates or network issues. For bulky items such as large furniture and mattresses, if the shipping cost is prohibitively high for any shipping zone, we recommend marking the zone as undeliverable.
Important Shipping Logic & Notes:
- Lowest Shipping Cost Applies: If a postcode falls within multiple zones where you have provided different shipping rates, the system will automatically process the order using the lowest available shipping rate.
- Undeliverable Postcodes: Please enter "9999" to indicate that you cannot service a particular postcode. Please note: If you set a rate of "9999" for any single zone that a postcode belongs to, that postcode will be considered undeliverable, even if other zones for that postcode have a valid shipping rate.
How to set shipping rates in bulk?
To make the bulk upload process easier and more convenient, you can use our Excel template.
For a cleaner and more streamlined view, the columns for the Defined (34 Zones) and Advanced (115 zones) shipping zones will be hidden by default. You can simply click the ‘+’ to expand and access these settings, which allow you to efficiently set your rates for multiple products at once.


*How can I disable the shipping rates for the Defined and Advanced shipping zones?
Once the shipping rates for the Defined and Advanced shipping zones is enabled, you’ll need to contact your Dropshipzone Supplier Account Manager to disable it.
How are my orders processed?
Once a Retailer places an order, it will appear on the Order Page of the Supplier Portal. Please provide shipping information for new orders within 2 business days of receiving the orders.
How to check order details
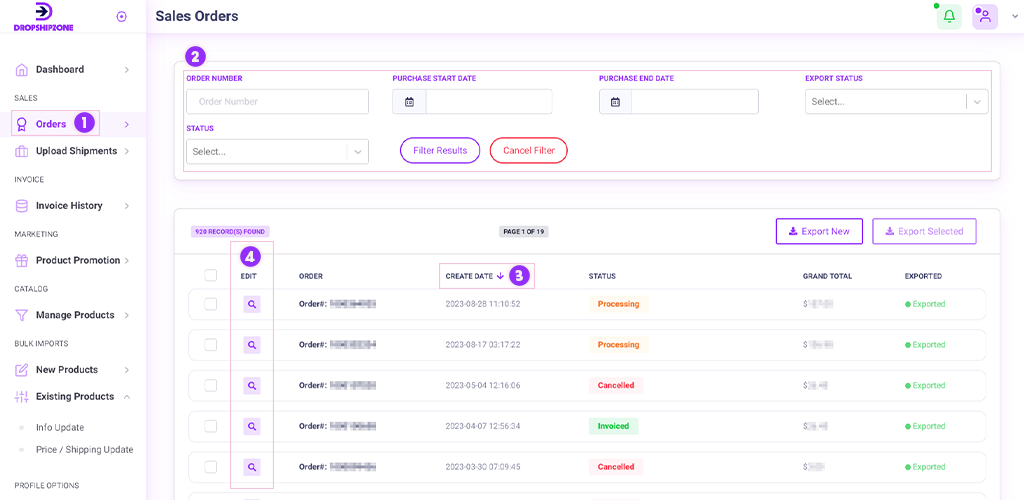
- Under the Sales heading, click on ‘Orders’.
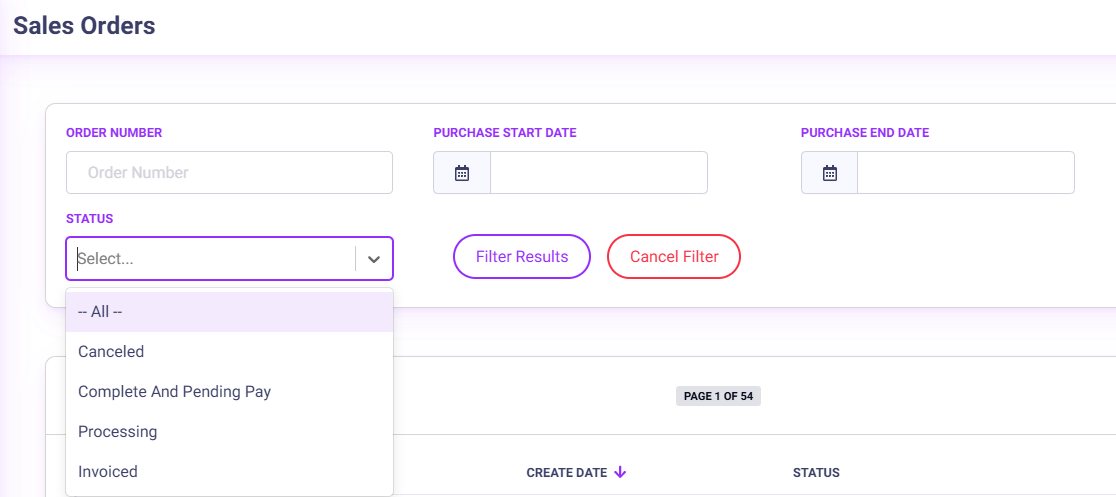
- To find a specific order, you can use the filter to search for orders by Order Number, Purchase Start/End Date, Export Status or Status.
- Click ‘Create Date’ to view orders in ascending or descending order.
- Click on the magnifying glass icon under the Edit column to enter the Sales Orders Details page.
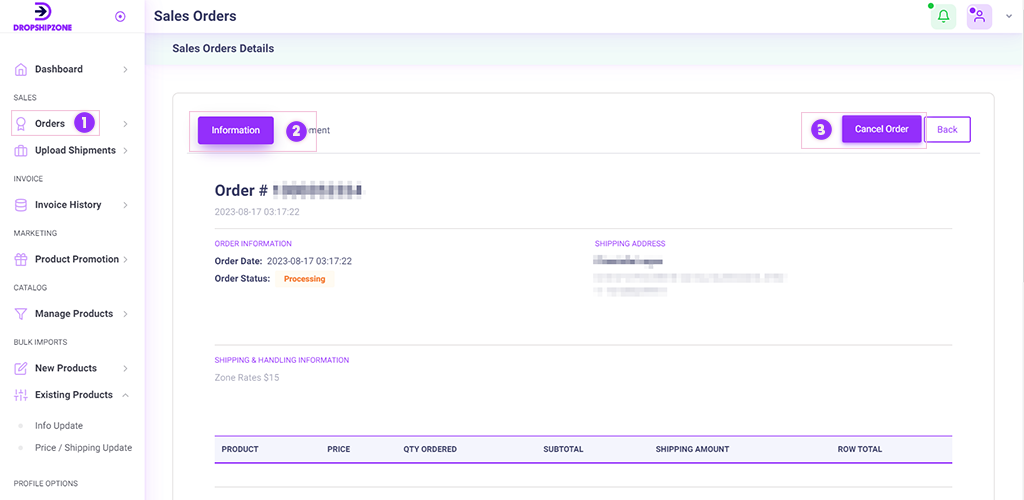
- From the Sales Orders Details page you can view the Order Number, Order SKUs, Order Date and Status, Shipping Address and Shipping and Handling information.
- Click ‘Add Comments’ to add notes to the order. These can only be seen by Suppliers.
Orders have four possible statuses:
- Canceled: Order has been cancelled.
- Complete and Pending Pay: Shipment has been arranged and tracking details have been uploaded, but the order is awaiting payment.
- Processing: Order needs to be shipped.
- Invoiced: Order is complete and has been invoiced.
How to add tracking information to orders
Tracking information should be uploaded within 2 business days of receiving the order. If we do not receive tracking information within 2 business days of the order being placed on Dropshipzone, we will send you a reminder. If you receive a reminder, please dispatch the order as a matter of priority. You can easily add tracking information to individual orders or upload in bulk.
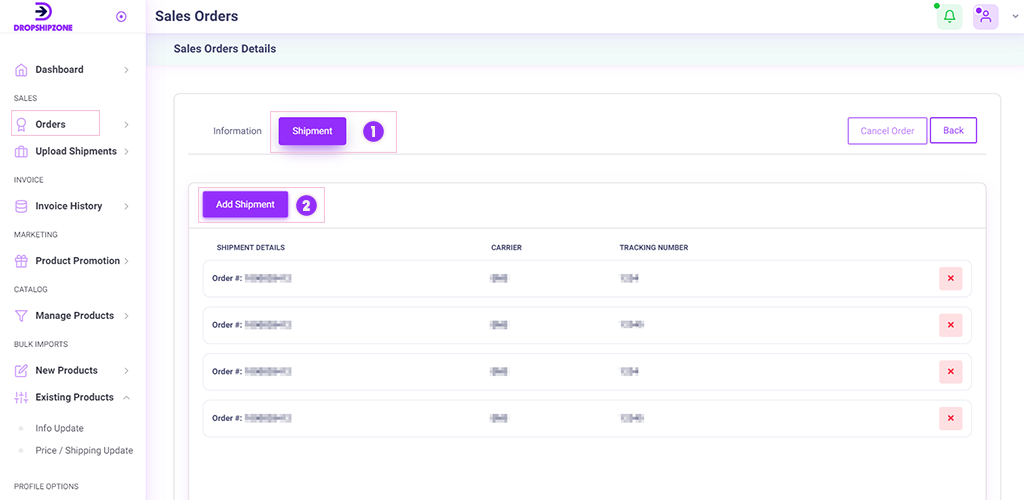
Adding tracking information to individual orders
- From the Sales Orders Details page, click on ‘Shipment’
- Click the ‘Add Shipment’ button.
- Choose the Carrier from the drop-down menu and input the Tracking Number given to you by the carrier.
- Click ‘Add’ to add the shipping information. This will now be available on the Sales Orders Details page.
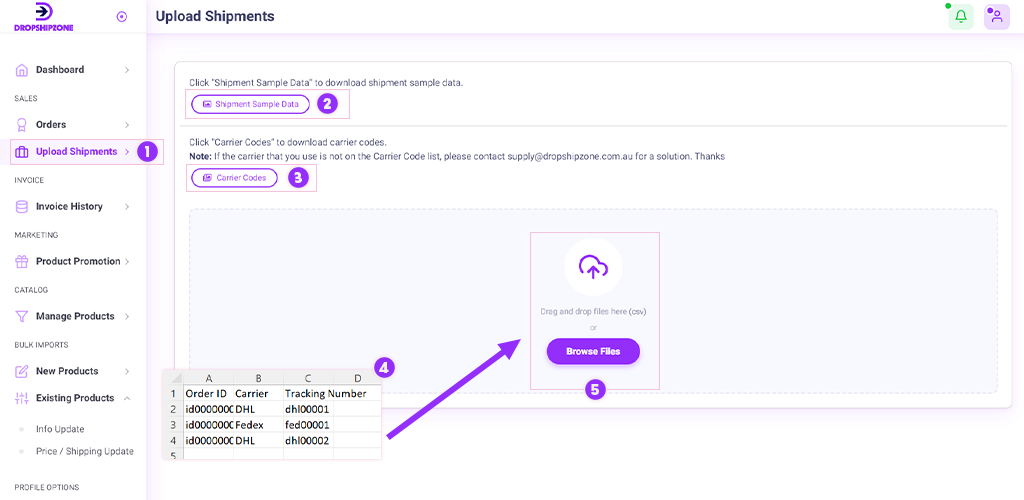
Adding tracking information in bulk
- Under the Sales heading, click on ‘Upload Shipments’.
- Click ‘Shipment Sample Data’ to download the template you’ll use to upload shipment details.
- You can download the carrier codes required by clicking on ‘Carrier Codes’. Note: If the carrier that you use is not on the Carrier Code list, please contact supply@dropshipzone.com.au for a solution.
- Fill in the relevant information.
Note: The column headers of the file cannot be deleted or changed.
- Upload the completed file.
- All relevant order statuses will then show as Complete and Pending Pay and tracking details will be added to the order page.
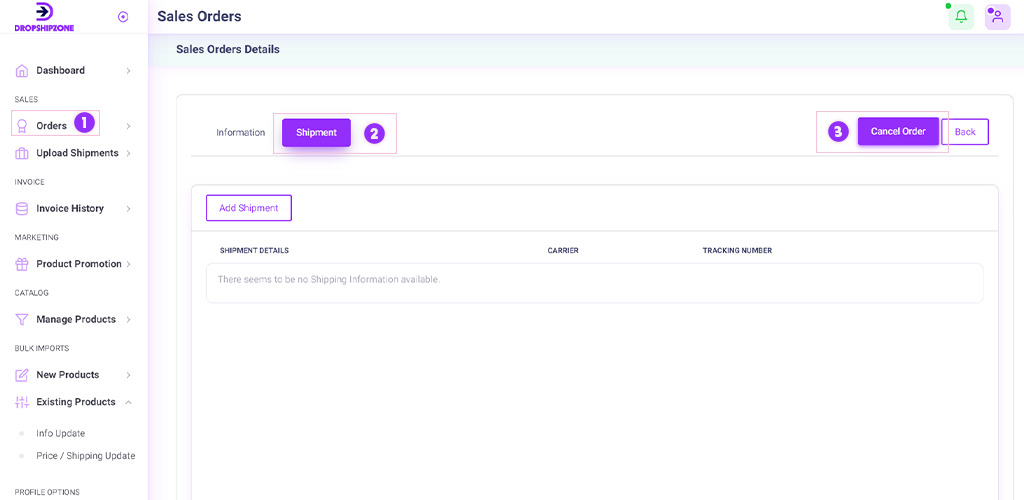
How to cancel orders from the Shipment page
From the Order Shipment page, you can cancel an order using the Cancel Order button. This can only be used while the order status is Processing. If a tracking number has been added, the order cannot be cancelled.
Note: Once tracking information has been added, your order will be marked as Complete. Because of this, the Shipment Details page cannot be left blank. If there is only one shipment record, it cannot be deleted or edited. To change the shipment details, you must upload the correct shipment details before deleting the existing record. Additional shipment records can be edited or deleted.
How to export order information in bulk
- Enter the Sales Orders page.
- Click on the button ‘Export New’ to export newly received orders (the Status will read Not Exported).
- Select individual orders and click on the button ‘Export Selected’ to export specific orders.
Note: A new order will only be exported once. Only 50 records will be displayed per page. ‘Select all’ will select all records only on the current page.
How to cancel orders
If an order cannot be fulfilled, you can easily cancel the order.
- From the Sales Orders Details Page, go to the upper right side of the page and click ‘Cancel Order’. Note: This button can only be used while the order is still Processing.
- Select the reason for cancellation so the customer will be notified immediately.
- Contact support@dropshipzone.com.au if another solution can be offered instead of cancellation.
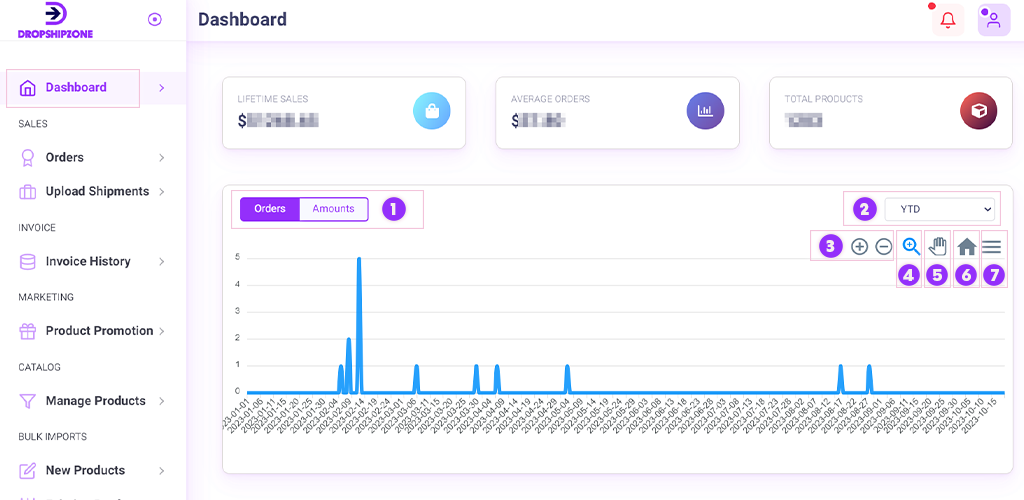
How to view your sales
You can view your lifetime sales data, average order value and total products from your Supplier Portal Dashboard.
- Click on Orders to view the number of orders and Amounts to view average order amounts over the selected period.
- Select the relevant time period using the drop-down menu on the far right.
- Use the + and - icons to zoom in and out of your specified time period.
- Use the magnifying glass to select and zoom on a specific time period manually.
- Use the hand icon to pan across your selected time period manually.
- Select the home icon to return to the default time period.
- Click the menu icon and choose your desired download format from the drop-down menu. You can choose from SVG, PNG or CSV.
Frequently asked questions

Once you’ve received an order through Dropshipzone, the order details can’t be changed. However, you can cancel the order and the Retailer can resubmit the order with the correct address.
You can input your shipping fees from the product page or in bulk via Excel template upload.
To set rates on individual products, click on the Shipping tab on the Add Product or Edit Product page. Fill out the shipping rates for each postcode zone.
To set rates on several products at once, go to the Bulk Imports section of your Dashboard and download the relevant templates. Fill out the shipping rates for each postcode zone, then upload the Excel file.
When providing product shipping fees, you can input ‘0’ to indicate free shipping or ‘9999’ to indicate an undeliverable zone.
Note: Shipping prices cannot be edited outside of the Price Review period.
In the case of missing or damaged packages, the Supplier will be held liable. Please refer to our Supplier Service Level Agreement for more information.
As a Dropshipzone Supplier, you can set our own terms and conditions regarding returns. However, these terms and conditions cannot supersede Australian Consumer Law or violate Dropshipzone terms of service.
In the case of change-of-mind returns: if a Supplier’s change-of-mind policy differs from those outlined by Dropshipzone, the return will be processed according to the terms provided by the Supplier on the condition that these terms have been made clear to the customer before purchase (e.g. through the product description).
In the case of damaged or missing goods, under Australian Consumer Law, the customer is responsible for returning the product to an Australian postal address if it can be posted or easily returned. The Supplier must reimburse the Retailer for reasonable postage and packaging costs. If the product cannot be posted, the Supplier is responsible for arranging, at their cost, the collection and return of the faulty product. Please refer to our Supplier Service Level Agreement for more information.
Retailers can submit warranty claims to Dropshipzone. Depending on the nature of the damage or fault, Suppliers can choose between a repair, replacement or refund. Suppliers are required to provide a remedy for product faults within 10 business days of being notified of the fault or damage from the Retailer. For more information please refer to our Supplier Service Level Agreement.


