
Before you start selling products online, you need to first import them to your online store. Shopify users can seamlessly import products to their online stores by downloading the Dropshipzone app from the Shopify App store.
In this chapter, we'll guide you through the process of searching and selecting products and seamlessly importing them into your online store. Let’s get started!
How do I search products for my online store?
Here’s how you can search for products to sell in your online store:
.gif)
Go to the dashboard and click on the Product Catalogue tab.
- From there, click Categories in the top left corner of the navigation bar.
- You will see a dropdown with a range of different Categories to explore.
- When you hover over a Category, the dropdown will expand with different Subcategories and Sub-subcategories.
.jpeg)
4. Once you have selected a product category, you will be redirected to the relevant page. Here you will able to see further subcategories at the top of the page.
You can also search for products using the search bar at the top of the page.
How do I filter products?
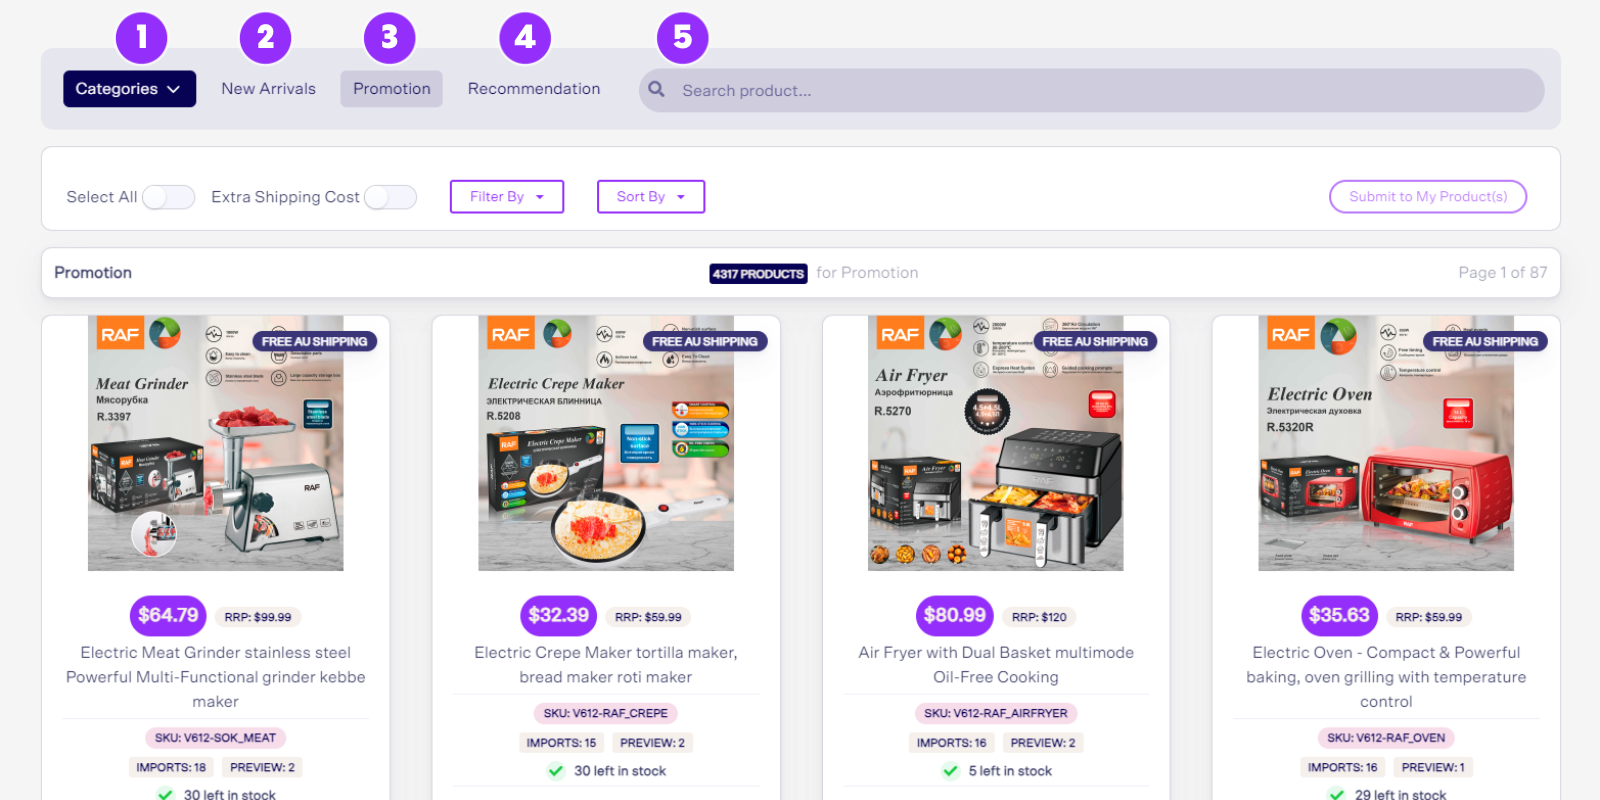
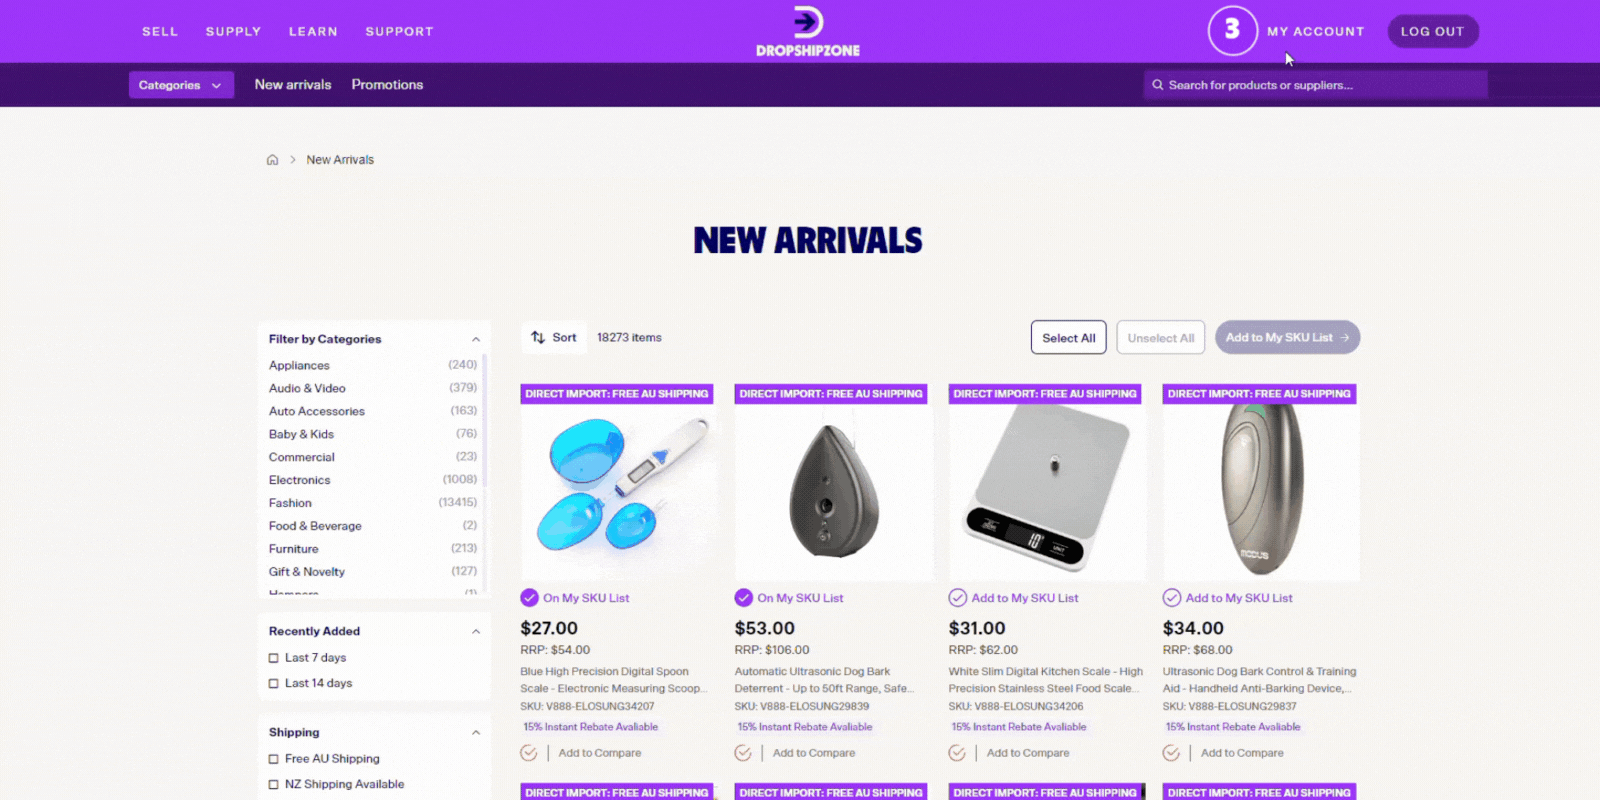
Once you’ve selected the product category page, you will then be able to explore products, check pricing, make comparisons, and select products to add to your My SKU list. Dropshipzone offers a wide range of product filters on Category, New Arrivals and Promotion pages to help you easily find the SKUs you want.
.jpeg)
- Category Filter: Use this filter to drill down further on subcategories and sub-subcategories.
- Recently Added Filter: Use this filter to find products added in the last 7 days, or last 14 days. Please note: This filter is only available on the New Arrivals page.
- Shipping Filter: Use this filter to find products by Free AU Shipping, NZ Shipping and Direct Import. 'Direct Import' indicates that the products will be shipped directly from overseas Suppliers.
- Special Offers Filter: Use this filter to find promotional SKUs. Please note: this filter is only available on the Category and New Arrivals page.
- Stock Level Filter: Use this filter to find In Stock, Out of Stock and Discontinued SKUs.
- My SKU List Filter: Use this filter to find SKUs on or off your SKU List. For more information, see How do I import products to my online store?
- Price Filter: Use this filter to find SKUs within a price range.
You can also use the Sort Function at the top of the page to sort products by Sales Volumes, Price or Recently Added in ascending or descending order.
Looking to compare SKUs? You can use the Compare Products function to compare any products.
.jpeg)
- To compare similar products, click on Add to Compare. You can compare a maximum of four products at a time.
- You will see the products in the Compare Products section located at the bottom of the filter bar.
- When you press Compare, it will take you to a new page.
Navigating the product listing page.
When you select a product, it will take you to the individual product listing page.
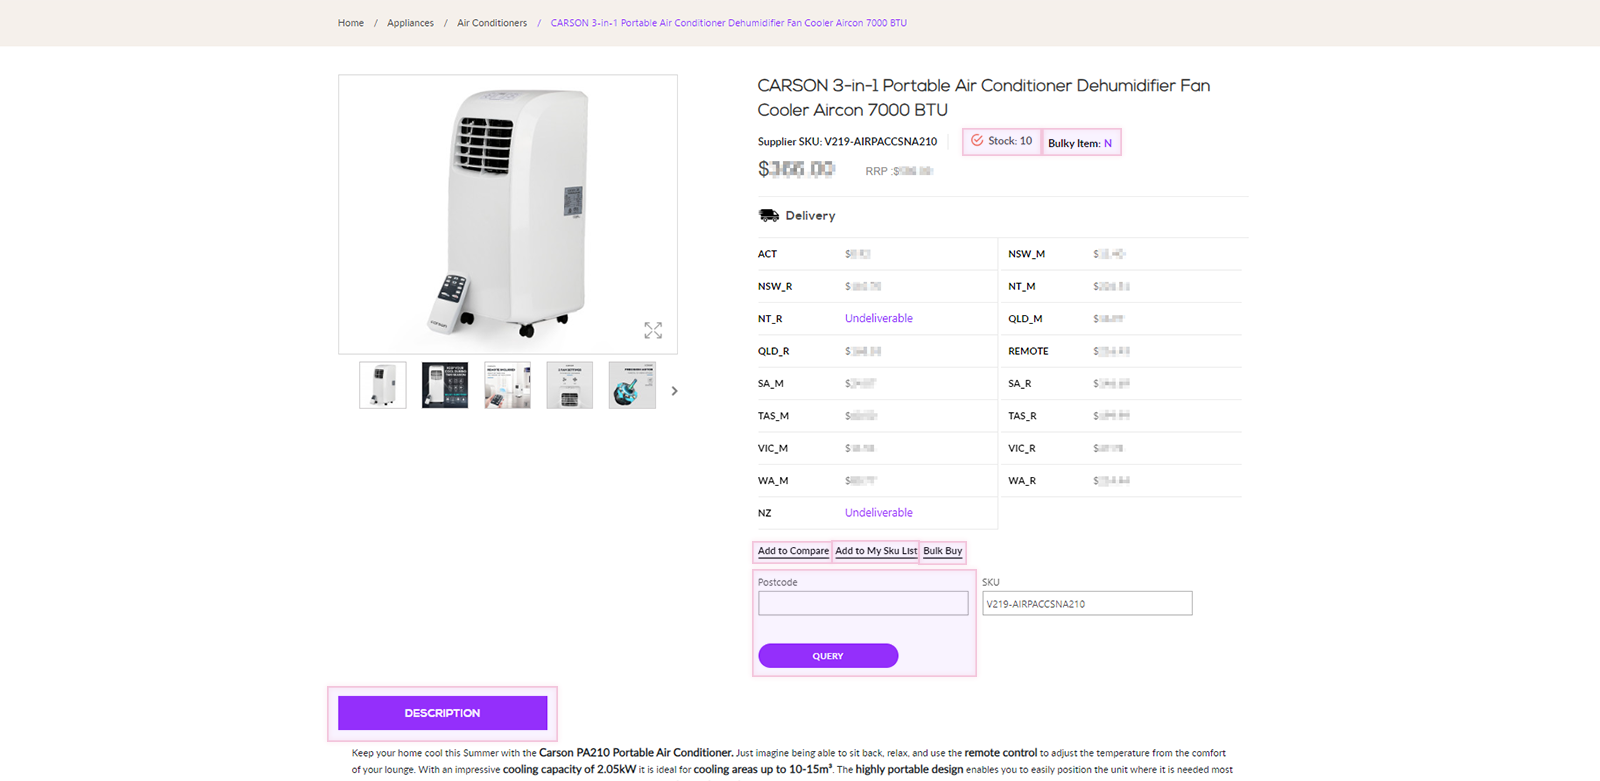
On this page, you can view descriptions, images, titles, pricing, and shipping and delivery information. Verify SKU postage by entering the postcode and click Query. You can even compare products, add them to your list, and enquire about bulk purchases directly from this page.
How do I filter and search products? For Shopify Users
If you’re a Shopify user, your product catalogue might look a little different to the one that’s on the main website. Here’s how you can search and filter products in the Shopify Catalogue.
Searching for Products.
- Categories: Looking for a specific category? Open the dropdown menu and select from over 15 categories. Each category will expand when hovered, allowing you to expand your search.
- New Arrivals:
- Here, you can browse New Arrivals, so you never miss out on new products.
- Promotion: Looking for a deal? Here you can find all products that are currently on promotion.
- Recommendation: Not sure where to start? Check out the recommendation tabs for products that might be relevant to you and your store.
- Search Bar: Here you can search specific keywords or SKUs.
Filtering Products.
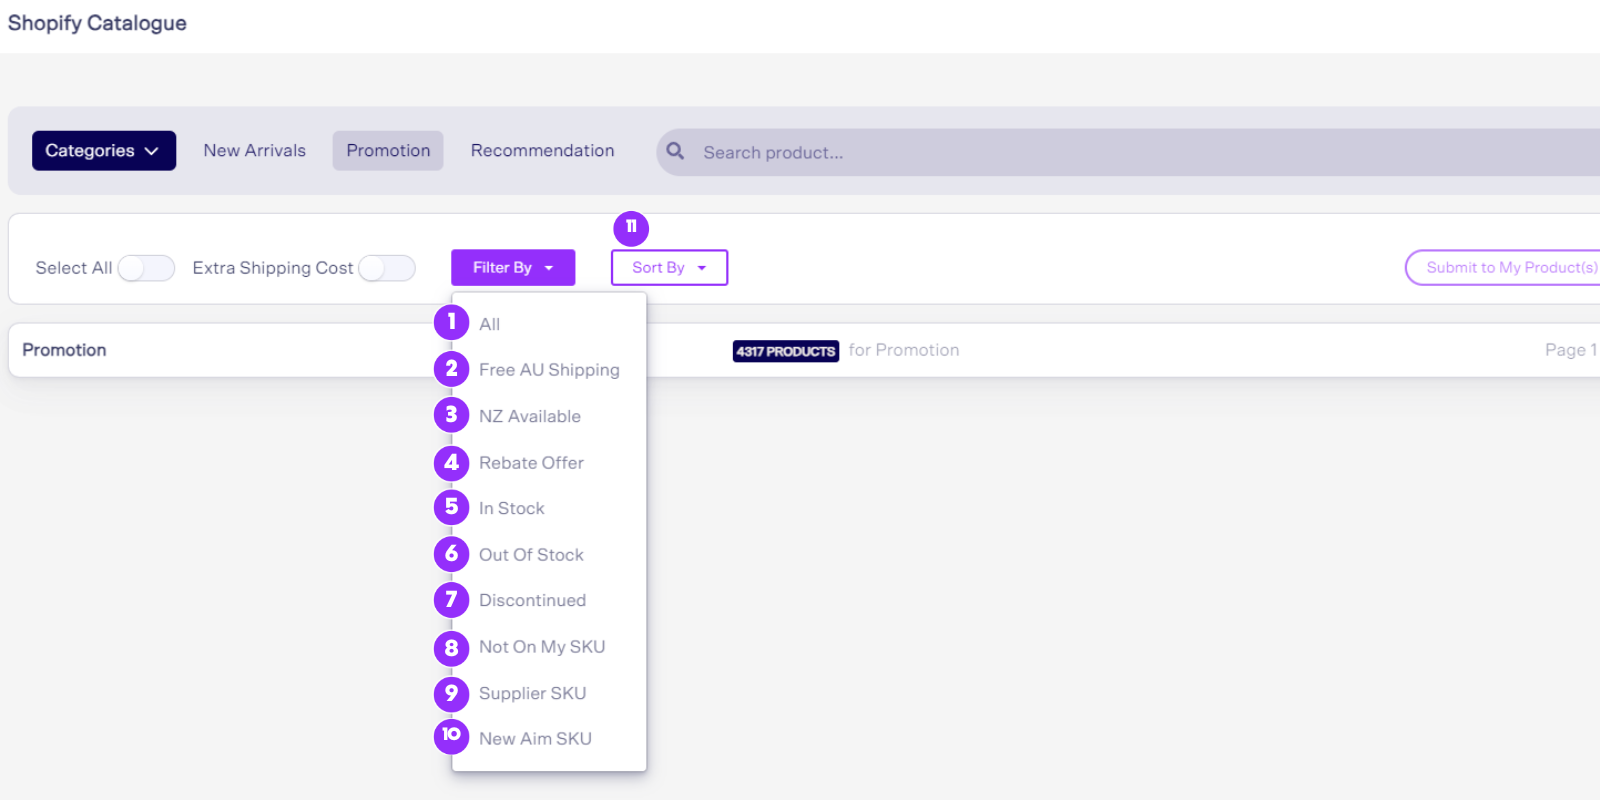
- All: You can click this filter to reset or clear all filters.
- Free AU Shipping: Use this filter to find products that offer free shipping to Australia addresses.
- NZ Available: Use this filter to find products that can be shipped to New Zealand.
- Rebate Offer: This filter can help you find products that are eligible for the Sell and Save rebate program. If you’re interested in knowing more about what current rebates you are eligible to participate in, speak to your Account Manager.
- In Stock: Use this filter to find in stock products.
- Out of Stock: Use this filter to in out of stock products.
- Discontinued: Use this filter to find discontinued products. Dropshipzone highly recommends removing discontinued products from your online store.
- Not On My SKU: Use this filter to find products that are not yet on your SKU list.
- Supplier SKU: Use this filter to find products offered by 3rd party Suppliers.
- New Aim SKU: Use this filter to find products from our trusted Supplier, New Aim.
- Sort By Filter: Use this to sort products by price.
Navigating the Product Page.
When you select a product, it will take you to the individual product listing page.
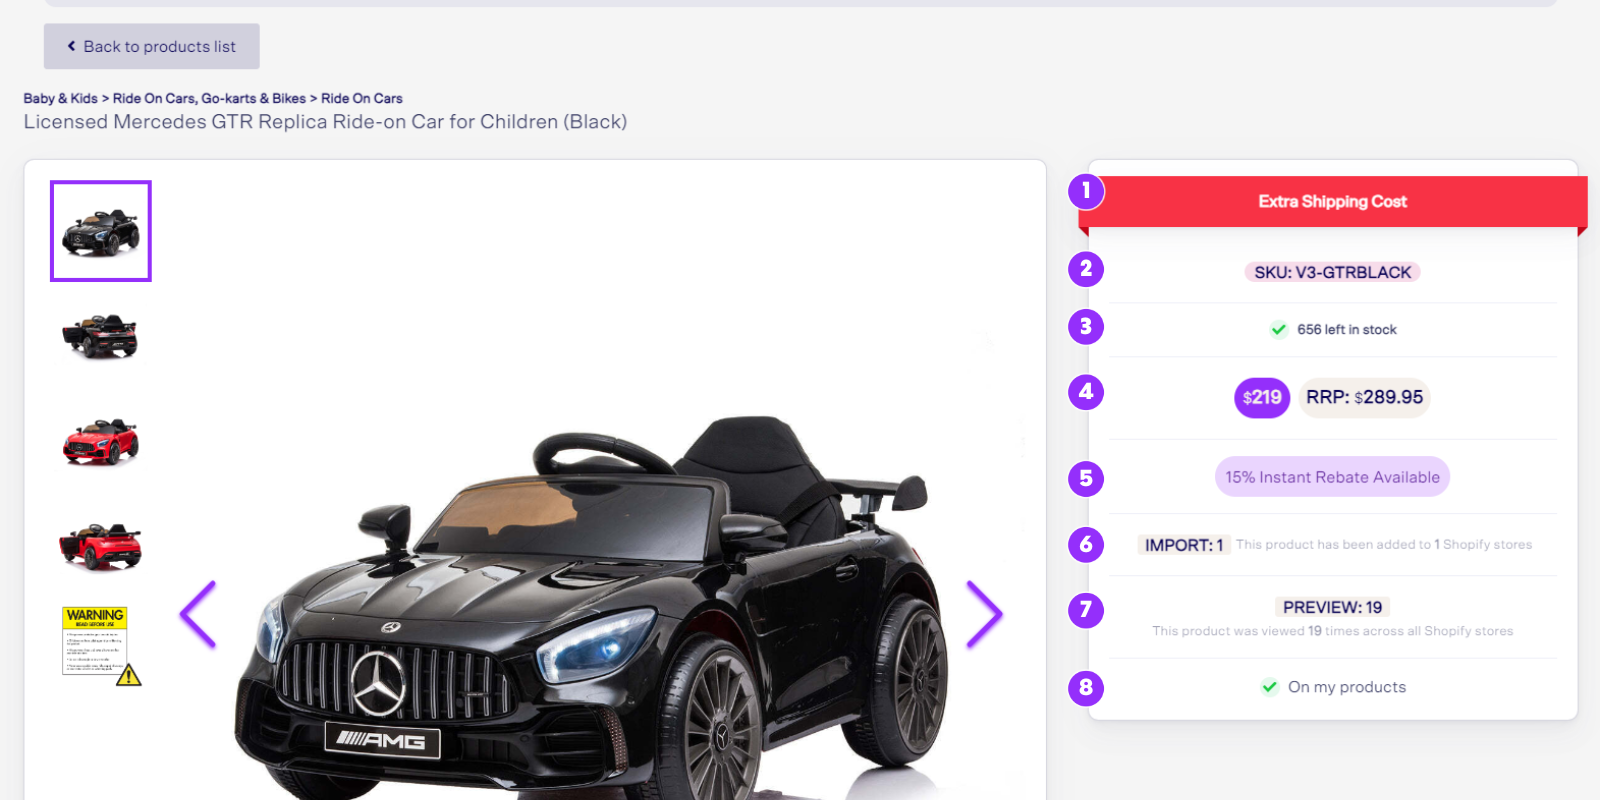
- Shipping Cost Indicator: This banner tells you if this product incurs a shipping fee.
- SKU Label: You can find the product SKU here.
- Stock Label: See the stock levels of the product here.
- Price and RRP: View the product price and RRP here.
- Rebate Eligibility: This section will highlight whether this product is eligible for that months running Sell and Save rebate. It will also tell you what rebate percentage is on offer for that product.
- Import: Indicates how many other Dropshipzone Retailers have imported this product to their store.
- Preview: Indicates how many othe users have viewed this product.
- My products: Indicates if this product is currently on your Use this filter to find products that are not yet on your SKU list.
How do I import products to my online store?
Once you’ve chosen the products for your online store, the next step is to add them to your My SKU list and import them into your online store.
- To import the chosen products to your My SKU list, you can select products individually by clicking on Add to My SKU List .
- Alternatively you can add SKUs to your My SKU list in bulk by using the Select All option, followed by the Add to My SKU List button.
.png)
- After adding your selected SKUs to the My SKU List, click on My Account.
- Navigate to the Download SKU section under My Account. From here you will be redirected to the My SKU page in the Retailer portal.
- On the My SKU page, you can sort by time added. You are also able to filter products by Stock Level, Recently Added as well as search by Product Name or SKU.
- Once you're happy with your My SKU Select it's time to download. Select the products you want to download, and press the download button.
- You'll be able to choose from a dropdown of different formats to export your file in. Each platform operates in a different way. Dropshipzone provides you the option to download the full SKU list in Shopify, Woocommerce and general format. You can even use various integration capabilities provided by Dropshipzone to enhance efficiency.
How do I import products to my Shopify store specifically?
If you operate a Shopify store, importing products to your online store is easy with the Dropshipzone Shopify app. To import products to your Shopify store, follow these steps:

- Navigate to the Shopify section on the dashboard and click Shopify Catalogue.
- Select a product category that you’d like to sell on your Shopify store using the Categories dropdrop button in the top left. Here, you can explore different products available in this category, check pricing, and select products to add to your Shopify store.
Please note that you’ll see two new labels on product images: Direct Import and Direct Import: Free AU Shipping. ‘Direct Import’ indicates that the products will be shipped directly from overseas Suppliers with an additional shipping fee, while ‘Direct Import: Free AU Shipping’ means that products will be shipped from overseas Suppliers with free shipping. Be sure to look for these labels when selecting products for your Shopify store.
- To import products to your Shopify store, select products by clicking on Add to Import List. Then, click the Submit to My Product(s) button at the top right of the page.
You’ll see a pop-up window appear on your screen with the selected products and their pricing. At this stage, you also have an option to remove the product from your import list by clicking the Cancel icon under Actions.

4. To confirm your selection, click the Add to My Shopify Store button at the bottom of the window.
5. Once you’ve confirmed your selection, you’ll see a pop-up window with a message Products import submitted. You can track its status through the progress bar in the upper right. The processing time varies from hours to days, depending on the number of SKUs that you’ve selected and your network speed. (You can leave the page while the importing is running on the backend.)
As a Shopify store owner, you can alternatively manually import products to your store. Click here to find out how you can do it.
Please make sure to set up Merchant pricing rules and enable Auto Price Sync for auto price syncing before importing products to your Shopify store.
The pricing rule you make will be applied to products and will reflect on the Auto Price Sync dashboard if Auto Price Sync is enabled. The Dropshipzone app on Shopify also enables you to check products that are currently being sold below Dropshipzone price by enabling the Below DSZ Price filter in the My Products tab within the My Store section.
How do I bind products from my Shopify store to Dropshipzone?
The ‘Bound’ function is necessary to enable auto price and inventory syncing, while ‘Unbound’ means products on your Shopify store are not linked to your Dropshipzone account. Products will be automatically bound if they are imported to your Shopify store through the Dropshipzone app. Once the products are bound to your Shopify store, any modifications to markup rules or inventory updates made on the Dropshipzone Shopify app will be automatically updated and reflected.
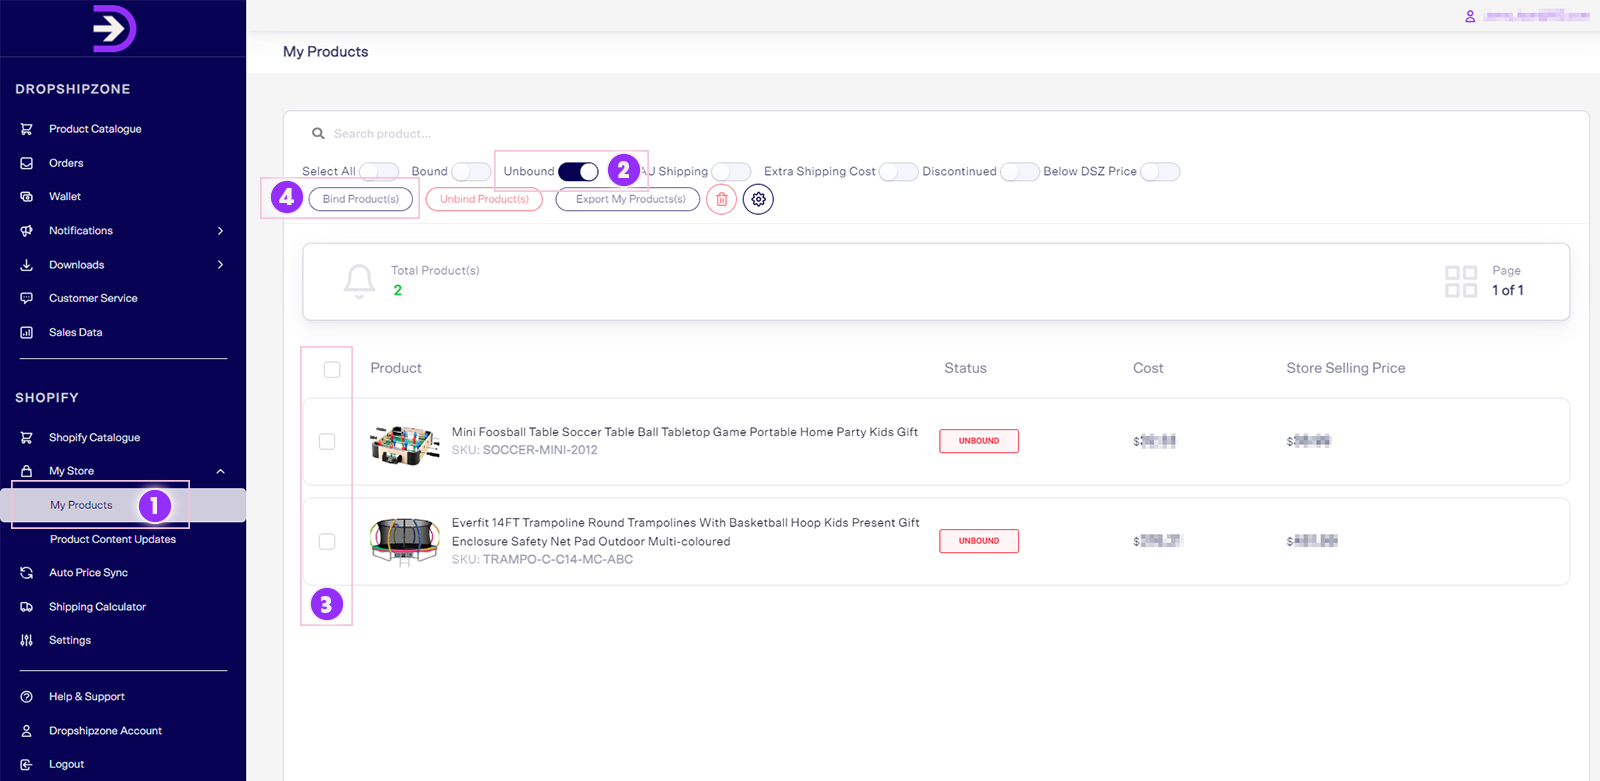
- To bind products from your Shopify store, navigate to the My Store tab within the Shopify section and click My Products.
- Sort by the filter option labelled Unbound. Here, a list of products that are currently unbound will be displayed.
- Review your list of unbound products and select the products that you want to bind to your Shopify store.
- Click on Bind Products. You’ll receive a pop-up message after the binding process has been successfully completed.
How do I unbind Dropshipzone products from my Shopify store?
The ‘Unbound’ function stops auto price and auto inventory syncing. Once the products are unbound from your Shopify store, the Dropshipzone app will no longer refresh the SKUs. However, the SKUs will still exist in your Shopify store.
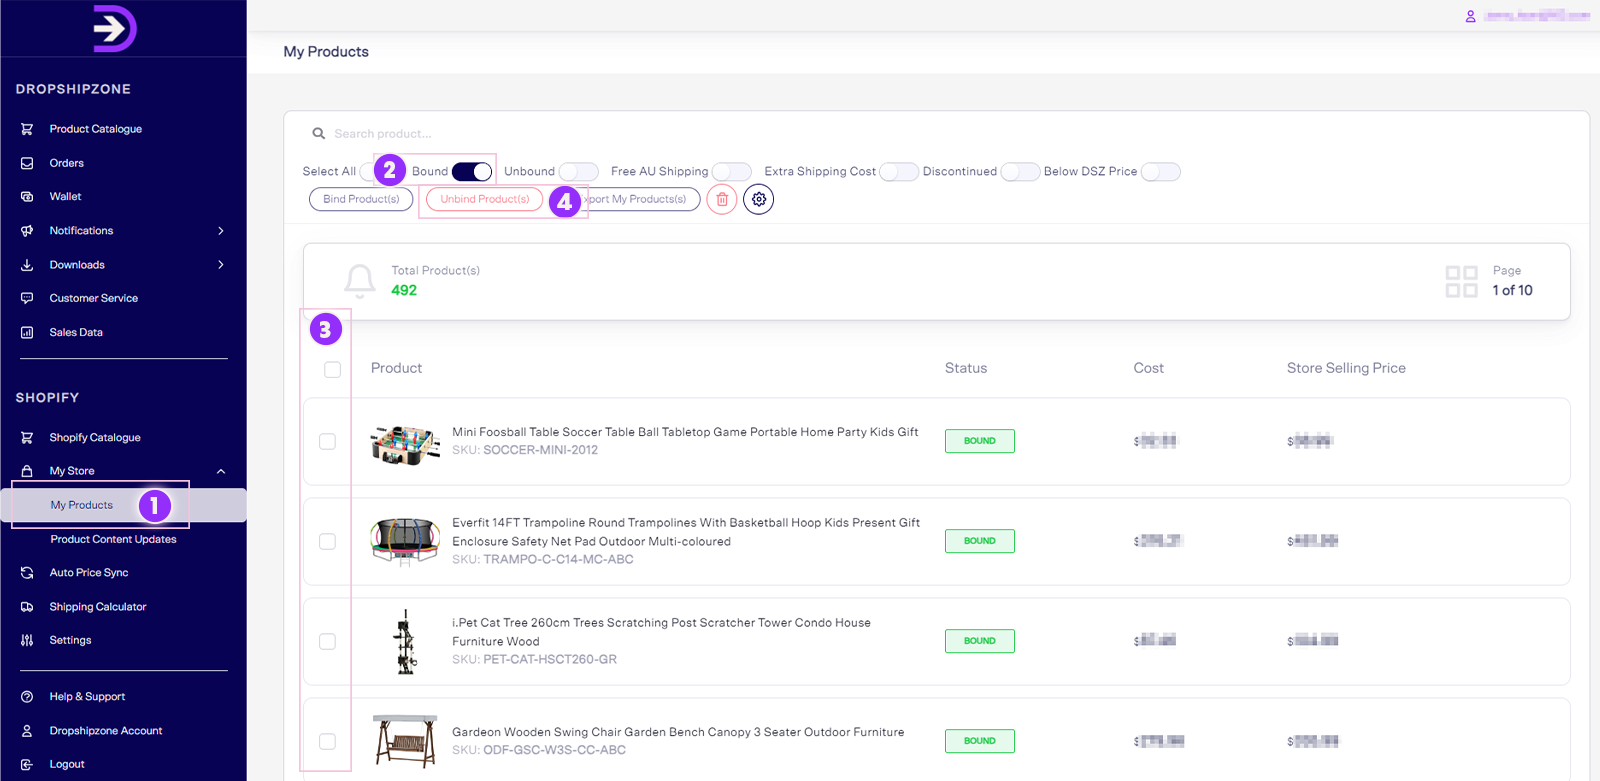
- To unbind products from your Shopify store, navigate to the My Store tab within the Shopify section and click My Products.
- Sort by filter option labelled Bound. Here, a list of products that are currently bound will be displayed.
- Review the list of bound products and select the products that you want to unbind from your Shopify store.
- Click on Unbind Products. You’ll receive a pop-up message after the unbinding process has been successfully completed.
Retailers can occasionally review the SKUs that are bound to their Shopify store to identify if any SKUs have been discontinued (meaning products that won’t be restocked in the future on Dropshipzone). To identify discontinued SKUs, click on Bound and Discontinued. Then, a list of products that are currently bound and discontinued will be displayed. Select the discontinued products and click Unbind Products to unbound them from your Shopify store.
Once the SKUs are unbound from your Shopify store, the Dropshipzone app will stop updating these SKUs, however, these SKUs will still exist in your Shopify store. To remove these SKUs from your Shopify store, select these SKUs and use the Remove function to delete them from your Shopify store.
Frequently asked questions

Yes, you can sell any product listed on Dropshipzone on any sales channel. For your peace of mind, we provide Authorisation Letters for the brands featured on Dropshipzone. However, you don’t need Authorisation Letters to sell everything from Dropshipzone. If you can’t find the Authorisation Letter for the brand you wish to sell, kindly contact your Dropshipzone Account Manager.
To download the Authorisation Letters, follow these steps:
- Navigate to the Downloads tab within the Dropshipzone section and click Authorisation Letters.
- Click on the Download button next to the respective brand name.
Please be informed that the Authorisation Letter expires 1 year from the date of issue. You can download it again one week prior to the expiry date to renew it.
You can find our latest products by navigating to the Categories section within the Product Catalogue tab. From there, click New Arrivals to view the newly-arrived items on our catalogue. And don’t forget to check your weekly new arrivals and product updates notifications email.
To disable the watermark on product images, navigate to the SKU tab within the Downloads section. Then, untick the Enable Watermark checkbox and click Save.


